So this project has been on the back burner for some time. I never got the hardware over to something besides a breadboard, and I did not have the software running in the RPi0W. I have a three day weekend coming up and I thought I might revive it and get it working with the Home-Assistant setup in my house. I am trying to at least get the interface to my car working with the lights on the porch using this setup. At this point I am thinking my best bet will be to load docker into the raspberry pi zero w and spin up a container of nodered to interface with the RPi0W and to send out packets to my MQTT server when buttons are pressed on my Subaru rear view mirror. I decided to use an 8GB micro SD for this project since not much will change.
1. First things first - install Buster using the Win32DiskImager (see Stupid RPi Tip #5)
2. Next update the OS (Buster went from test to stable, so have to use apt instead of apt-get first)
sudo apt update
sudo apt-get upgrade
3. Next install docker
curl -sSL https://get.docker.com | sh
4. now that we have docker installed, need to get a working version of nodered in a docker container; also, it might be nice to have Portainer running to check status; we will use docker-compose for this (I usually set everything up in a directory in /srv/docker/); docker-compose.yml file is as follows:
version: '3'
services:
portainer:
container_name: portainer
image: portainer/portainer
volumes:
- /srv/docker/portainer:/data
- /var/run/docker.sock:/var/run/docker.sock
ports:
- "9000:9000"
nodered1:
container_name: node-red-1
restart: unless-stopped
image: nodered/node-red-docker
user: root
volumes:
- /srv/docker/node-red-1/user:/data
- /etc/localtime:/etc/localtime:ro
ports:
- "1880:1880"
Prior to launching DockerCompose we need to have a directory /srv/docker/node-red-1/ and /srv/docker/portainer/ ready to go.
mkdir /srv/docker/portainer
mkdir /srv/docker/node-red-1
Now put the docker-compose.yml file into /srv/docker/ directory. Next launch DockerCompose
DockerCompose up
This should get us started with node-red running in the container
To Be Continued ...

This is a blog mostly about techie things, what I am doing to my apartment network on the cheap, IOT, 3D Printing, Raspberry Pis, Arduinos, ESP32, ESP8266, Home Automation, Personal Weather Stations, Things That Go Bump in the Night, and some side issues that need discussing. Remember, sometimes the journey to an end is as much fun as the goal achieved!
Thursday, September 5, 2019
HomeLink HA Interface #5 - Ooops!
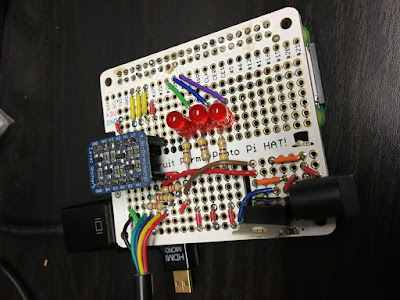
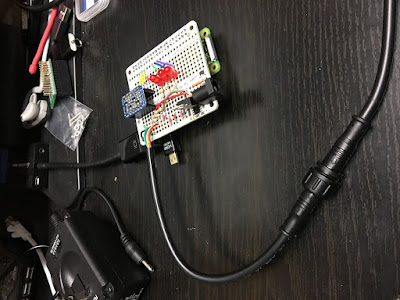
I decided to get back into putting the interface together and finishing out the prototype. I also decided to pull it apart from the breadboard and put the hardware onto an Adafruit perma-proto board that would interface directly to the RPi0W. Little did I know that I would make a strategic mistake.
First of all, I pulled up Fritzing and put the wiring up on the board (visually) as shown:

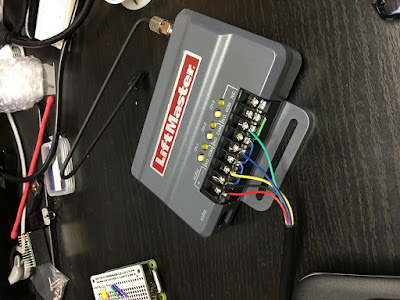
As shown, I added three red LEDs to be able to pulse as a visual reference when the HomeLink channel is selected. I also place a 7805 power tab in the lower right hand corner of the board. If the board looks weird it's because it is the size normally used for a regular sized RPi. And yes, it does overhang. The 5 lines are actually a cable that goes from the breadboard to the LiftMaster. These can be seen in the following images:
The Ooops in the title stems from the fact that when I applied power (9v to the breadboard connector) I encountered the following:
What I have since surmised is that the peripherals that I had plugged into the RPi0W were drawing way more than the 1 amp max the 7805 could handle. So what I plan on doing is removing the 7805 and replacing it with a 5v 2.5a supply that plugs into the RPi0W connected with a step up converter to push 9v to the LiftMaster which only draws 40ma.
First of all, I pulled up Fritzing and put the wiring up on the board (visually) as shown:

As shown, I added three red LEDs to be able to pulse as a visual reference when the HomeLink channel is selected. I also place a 7805 power tab in the lower right hand corner of the board. If the board looks weird it's because it is the size normally used for a regular sized RPi. And yes, it does overhang. The 5 lines are actually a cable that goes from the breadboard to the LiftMaster. These can be seen in the following images:


The Ooops in the title stems from the fact that when I applied power (9v to the breadboard connector) I encountered the following:
- while the RPi0W was booting, I tried out the clicker with the LiftMaster and it was working fine
- the bootup of the RPi0W seemed to be going fine, then it rebooted, and then rebooted, etc.
- I reached over to turn off the monitor I was using and burned my finger on the 7805 poking up from the breakboard
- I went and got my temperature laser reader and when I rebooted the RPi0W I was reading in short order about 150 degrees Fahrenheit. Way too much current was being drawn.
What I have since surmised is that the peripherals that I had plugged into the RPi0W were drawing way more than the 1 amp max the 7805 could handle. So what I plan on doing is removing the 7805 and replacing it with a 5v 2.5a supply that plugs into the RPi0W connected with a step up converter to push 9v to the LiftMaster which only draws 40ma.
Sunday, September 1, 2019
Project #16 - Add a DNS-DHCP-Radius Server for use Across the Network
It seems like a good idea to add a single place where I can get DNS, DHCP, and provide a Radius Server for authentication of the Routers and Switches.
Monday, July 22, 2019
Setting up a Certificate Authority on the RPi
One of the things that I have determined that I need in my system is the ability to create security certificates, especially X.509 certs. I don't want to have to spend money for certifications that I will only be using internally to my network or in connecting to my network. I can do this by setting up my own Certificate Authority (CA). A CA is used to create and sign certificates as being authenticate. Since I am in a controlled environment I can make sure that these certificates are specific to my needs and since I will not be releasing the public CA certificate, will allow me to control access to my network.
I can use the CA to sign certificates to be used with: my internal network connections, openVPN, and IPSec connections from the outside. In addition, I need to setup a simplified way of creating symetric encryption certificates. I will only have the CA open long enough to do what I need to do and then I will shut it down and remove it from my network - so it will remain secure from attack from the outside. I can also use it at work to do my certificates without being connected to a network so it is even more secure.
I used one specific article to setup my Certificate Authority at xxxxx. I am repeating the steps here for reference purposes:
Make an SSL Certificate Authority and Associated Certificates
(1) Create the Root Key
[Mydev@xxx My_CA]$ mkdir -p MyCA/cert MyCA/key
[Mydev@xxx My_CA]$ cd MyCA
[Mydev@xxx MyCA]$ openssl genrsa -aes256 -out key/Myca.key.pem 4096
Generating RSA private key, 4096 bit long modulus
.......................................................++
....................................................................++
e is 65537 (0x10001)
Enter pass phrase for key/Myca.key.pem:
Verifying - Enter pass phrase for key/Myca.key.pem:
[Mydev@xxx MyCA]$ chmod 400 key/Myca.key.pem
[Mydev@xxx MyCA]$
(2) Create the Root Cert
[Mydev@xxx MyCA]$ openssl req -key key/Myca.key.pem -new -x509 -days 3650 -sha256 -extensions v3_ca -out cert/Mycert.pem
Enter pass phrase for key/Myca.key.pem:
You are about to be asked to enter information that will be incorporated
into your certificate request.
What you are about to enter is what is called a Distinguished Name or a DN.
There are quite a few fields but you can leave some blank
For some fields there will be a default value,
If you enter '.', the field will be left blank.
-----
Country Name (2 letter code) [XX]:US
State or Province Name (full name) []:MyState
Locality Name (eg, city) [Default City]:MyTown
Organization Name (eg, company) [Default Company Ltd]:HOME
Organizational Unit Name (eg, section) []:HOME
Common Name (eg, your name or your server's hostname) []:My CERT
Email Address []:myemail@myemail.com
[Mydev@xxx MyCA]$
Note: cert/Mycert.pem is the CA's certificate and is public - this needs to be loaded into all clients in the My network. key/Myca.key.pem is the CA's private key - it is protected by the password MYCAKEYPASSWORD and it should be restricted access so that only root can read it.
(3) Create the First Server key/cert combo
[Mydev@xxx MyCA]$ mkdir myserver1
[Mydev@xxx MyCA]$ openssl genrsa -aes256 -out myserver1/myserver1.My.local.key 4096
Generating RSA private key, 4096 bit long modulus
.........................................................................................................++
................................................................................++
e is 65537 (0x10001)
Enter pass phrase for myserver1/myserver1.My.local.key:
Verifying - Enter pass phrase for myserver1/myserver1.My.local.key:
[Mydev@xxx MyCA]$ openssl req -new -key myserver1/myserver1.My.local.key -out myserver1/myserver1.My.local.csrEnter pass phrase for myserver1/myserver1.My.local.key:
You are about to be asked to enter information that will be incorporated
into your certificate request.
What you are about to enter is what is called a Distinguished Name or a DN.
There are quite a few fields but you can leave some blank
For some fields there will be a default value,
If you enter '.', the field will be left blank.
-----
Country Name (2 letter code) [XX]:US
State or Province Name (full name) []:MyState
Locality Name (eg, city) [Default City]:MyTown
Organization Name (eg, company) [Default Company Ltd]:HOME
Organizational Unit Name (eg, section) []:HOME
Common Name (eg, your name or your server's hostname) []:My OPERATOR CERT
Email Address []:myemail@myemail.com
Please enter the following 'extra' attributes
to be sent with your certificate request
A challenge password []:
An optional company name []:
[Mydev@xxx MyCA]$ openssl x509 -req -days 3650 -in myserver1/myserver1.My.local.csr -CA cert/Mycert.pem -CAkey key/Myca.key.pem -set_serial 01 -out myserver1/myserver1.My.local.crt
Signature ok
subject=/C=US/ST=MyState/L=MyTown/O=HOME/OU=HOME/CN=My OPERATOR CERT/emailAddress=myemail@myemail.com
Getting CA Private Key
Enter pass phrase for key/Myca.key.pem:
[Mydev@xxx MyCA]$
(4) Make a passwordless version of the server key
[Mydev@xxx MyCA]$ openssl rsa -in myserver1/myserver1.My.local.key -out myserver1/myserver1.My.local.key.insecure
Enter pass phrase for myserver1/myserver1.My.local.key:
writing RSA key
[Mydev@xxx MyCA]$ mv myserver1/myserver1.My.local.key myserver1/myserver1.My.local.key.secure
[Mydev@xxx MyCA]$ mv myserver1/myserver1.My.local.key.insecure myserver1/myserver1.My.local.key
Note: this passwordless key is the key that we will ultimately use so that we do not need human intervention when trying to use the certs. Otherwise you type in the cert password everytime you restart the service.
(5) Import the CA and Cert
Note: copy the MyCA/Mycert.pem, myserver1/myserver1.My.local.key, and myserver1/myserver1.My.local.crt files to the server. The MyCA/Mycert.pem has to be imported into the certificate store - this is the intermediate CA certificate and identifies the myserver1 certs as valid.
(6) Repeat for the Second cert
[Mydev@My-ib6-devel MyCA]$ mkdir myserver2
[Mydev@My-ib6-devel MyCA]$ openssl genrsa -aes256 -out myserver2/myserver2.My.local.key 4096
Generating RSA private key, 4096 bit long modulus
............................................................................................................................................................++
..................................++
e is 65537 (0x10001)
Enter pass phrase for myserver2/myserver2.My.local.key:
Verifying - Enter pass phrase for myserver2/myserver2.My.local.key:
[Mydev@My-ib6-devel MyCA]$ openssl req -new -key myserver2/myserver2.My.local.key -out myserver2/myserver2.My.local.csr
Enter pass phrase for myserver2/myserver2.My.local.key:
You are about to be asked to enter information that will be incorporated
into your certificate request.
What you are about to enter is what is called a Distinguished Name or a DN.
There are quite a few fields but you can leave some blank
For some fields there will be a default value,
If you enter '.', the field will be left blank.
-----
Country Name (2 letter code) [XX]:US
State or Province Name (full name) []:MyState
Locality Name (eg, city) [Default City]:MyTown
Organization Name (eg, company) [Default Company Ltd]:HOME
Organizational Unit Name (eg, section) []:HOME
Common Name (eg, your name or your server's hostname) []:My MAINTAINER CERT
Email Address []:myemail@myemail.com
Please enter the following 'extra' attributes
to be sent with your certificate request
A challenge password []:
An optional company name []:
[Mydev@My-ib6-devel MyCA]$ openssl x509 -req -days 3650 -in myserver2/myserver2.My.local.csr -CA cert/Mycert.pem -CAkey key/Myca.key.pem -set_serial 01 -out myserver2/myserver2.My.local.crt
Signature ok
subject=/C=US/ST=MyState/L=MyTown/O=HOME/OU=HOME/CN=My MAINTAINER CERT/emailAddress=myemail@myemail.com
Getting CA Private Key
Enter pass phrase for key/Myca.key.pem:
[Mydev@My-ib6-devel MyCA]$ openssl rsa -in myserver2/myserver2.My.local.key -out myserver2/myserver2.My.local.key.insecure
Enter pass phrase for myserver2/myserver2.My.local.key:
writing RSA key
[Mydev@My-ib6-devel MyCA]$ mv myserver2/myserver2.My.local.key myserver2/myserver2.My.local.key.secure
[Mydev@My-ib6-devel MyCA]$ mv myserver2/myserver2.My.local.key.insecure myserver2/myserver2.My.local.key
(7) Repeat for the Third cert
[Mydev@My-ib6-devel MyCA]$ mkdir myserver3
[Mydev@My-ib6-devel MyCA]$ openssl genrsa -aes256 -out myserver3/myserver3.My.local.key 4096
Generating RSA private key, 4096 bit long modulus
...........................................................................................++
..........++
e is 65537 (0x10001)
Enter pass phrase for myserver3/myserver3.My.local.key:
Verifying - Enter pass phrase for myserver3/myserver3.My.local.key:
[Mydev@My-ib6-devel MyCA]$ openssl req -new -key myserver3/myserver3.My.local.key -out myserver3/myserver3.My.local.csr
Enter pass phrase for myserver3/myserver3.My.local.key:
You are about to be asked to enter information that will be incorporated
into your certificate request.
What you are about to enter is what is called a Distinguished Name or a DN.
There are quite a few fields but you can leave some blank
For some fields there will be a default value,
If you enter '.', the field will be left blank.
-----
Country Name (2 letter code) [XX]:US
State or Province Name (full name) []:MyState
Locality Name (eg, city) [Default City]:MyTown
Organization Name (eg, company) [Default Company Ltd]:HOME
Organizational Unit Name (eg, section) []:HOME
Common Name (eg, your name or your server's hostname) []:My ADMINISTRATOR CERT
Email Address []:myemail@myemail.com
Please enter the following 'extra' attributes
to be sent with your certificate request
A challenge password []:
An optional company name []:
[Mydev@My-ib6-devel MyCA]$ openssl x509 -req -days 3650 -in myserver3/myserver3.My.local.csr -CA cert/Mycert.pem -CAkey key/Myca.key.pem -set_serial 01 -out myserver3/myserver3.My.local.crt
Signature ok
subject=/C=US/ST=MyState/L=MyTown/O=HOME/OU=HOME/CN=My ADMINISTRATOR CERT/emailAddress=myemail@myemail.com
Getting CA Private Key
Enter pass phrase for key/Myca.key.pem:
[Mydev@My-ib6-devel MyCA]$ openssl rsa -in myserver3/myserver3.My.local.key -out myserver3/myserver3.My.local.key.insecure
Enter pass phrase for myserver3/myserver3.My.local.key:
writing RSA key
[Mydev@My-ib6-devel MyCA]$ mv myserver3/myserver3.My.local.key myserver3/myserver3.My.local.key.secure
[Mydev@My-ib6-devel MyCA]$ mv myserver3/myserver3.My.local.key.insecure myserver3/myserver3.My.local.key
Thursday, June 20, 2019
Network General - added an EdgeRouter X as an OpenVPN server
I had attempted to use one of the GL-iNet routers (AR800M) to act as an OpenVPN server on my network. I setup one of the vlans from the Main Router and had a whole lot of problems with the setup. I discovered that the EdgeRouter-X (ER-X) was only $65 from MicroCenter and a lot of people indicated that is was an easy setup for OpenVPN. I decided that what I would do was setup a vlan from the Cisco router with one of my unused vlans that flows throughout the network. So I designated one of my many vlans to be an “OpenVPN passthrough”. This will be similar in concept to the No-Mans Land vlan that I have been using for some time. The “OpenVPN passthrough” vlan will be setup so that you cannot change the Cisco router and you cannot access any other vlan. I will also punch some ports through the Cisco router to the Wan port of the ER-X. The OpenVPN setup is shown at https://help.ui.com/hc/en-us/articles/115015971688-EdgeRouter-OpenVPN-Server. I have found this to be a very easy setup. I also generated some additional OpenVPN client cents to use with my cell phones, iPads, and laptops.
Network General - Removed Quantum and re-arranged network to cover
After discovering that the Verizon Quantum router had pretty much bit the dust, I replaced the MOCA network with a Motorola MoCA 2.0 adapter and moved the Cisco router into its place. I am really disgusted with myself on not having done this sooner. The Cisco is very capable of the throughput speeds that my FIOS connection provides. In addition, I now have lots of vlan and QoS capability that I did not have before with the network.
I did discover however, when I went on a trip and dropped down a bunch of the equipment, that there are some network components that cannot be taken down without causing problems in other parts of the network. As I am typing this, my PWS is currently down because I took power away from a necessary component. So now I am on a mission to make the network efficient to be able to take most of the network down, including servers and the like, but still be able to function with other areas like the Television and Media transport.
So now I am on a mission to rearrange the patch panels and switch setup so that there will not be a hiccup in the future.
Friday, June 7, 2019
Had the opportunity to introduce someone to the Raspberry Pi and Arduinos
I had the opportunity today to give a package to a friend. He had expressed interest in getting into Arduinos and Raspberry Pis. So I put together a package consisting of a 3D printed Arduino Raspberry Pi Mount (https://www.thingiverse.com/thing:1190961), an Arduino Uno, a Raspberry Pi 3, some cables, a full-up micro SD with the latest Raspbian, and some lists of information to get him started. I will be out of town for a little while but I hope to be able to sit down with him to go over any questions that he may have. Knowing what fun I have had with these little buggers, I feel good that he asked me about them, and I am happy to share what I know. BTW, the information lists I provided are as follows:
Websites specific to Arduino
https://www.arduino.cc/
Tutorial Websites for Arduino
https://www.arduino.cc/en/Guide/HomePage
https://www.makerspaces.com/arduino-uno-tutorial-beginners/
https://www.youtube.com/watch?v=09zfRaLEasY
https://www.youtube.com/watch?v=nL34zDTPkcs
Reddit Groups for Arduino
https://www.reddit.com/r/arduino/
https://www.reddit.com/r/ArduinoProjects/
Books on Arduino (free)
https://www.programming-book.com/arduino/
Books on Arduino (cost)
https://makeradvisor.com/best-arduino-books/
Websites specific to Raspberry Pi
Tutorial Websites for Raspberry Pi
Reddit Groups for Raspberry Pi
Books on Raspberry Pi (free)
Books on Raspberry Pi (cost)
Network General - Had major crash in the network
I suffered a major crash in my network last weekend. What ever happened it borked my PWS Raspberry Pi setup. That was when I discovered that the network, specifically the Verizon Quantum router, was no longer getting DHCP assigned IP numbers. I did some tracing and found out that all of my TiVo equipment no longer had IP addresses.
When I went to troubleshoot the Quantum, I discovered that it no longer recognized the FIOS cable that was plugged into it. I checked everywhere for potential hardware breakages that would explain it but it would come up for a few seconds and then disappear. That is when I decided to take the Quantum out of the loop. For one, it was no longer issuing IP addresses from its DHCP server and the TV cable thing. I ordered a Motorola MOCA 2.0 adapter even though the TiVo Bolt was capable of setting up a MOCA network (I might still use this at a later date though). The real problem was the fact that the TiVo equipment (Bolt and 2 Minis) were not responding at all and had taken on Bonjour addresses. The Mini was able to communicate with the Bolt, but could not get back to the TiVo home page to receive updates. It also appeared that this was causing some issues in using the TiVo equipment.
I then added a vlan behind my Cisco router and moved all of the TiVo equipment there. When the MOCA adapter came in, I put it on the FIOS cable and connected it to the same vlan as the TiVo equipment. I then saw that my TiVo equipment had IP addresses and could be updated from the TiVo site.
I determined that the weewx setup on my Raspberry Pi had failed. It was causing kernel panics. I then changed out the RPi hardware and setup a new weewx software build and got the PWS back online.
All of my traceback seemed to indicate that the Quantum had undergone a hard failure, no amount of reseting the Quantum seemed to revive it's capabilities. So I made the decision to phase out the Quantum router. I was able to get to the outside through the Quantum, but only because my Cisco Router has a manually assigned IP address in the Quantum LAN subnet. I did some research and it seems that it is a fairly simple matter to take down the Quantum and bring up the Cisco in its place.
Will report back when I get this working.
Tuesday, May 21, 2019
Hack Lab #4 - Setting up Dradis for Tracking Hacking Activities
I have been using Kali Linux for a while since I started doing the OSCP labs. Up to this point I had always used KeepNote to maintain my notes on what I did to what boxes and what I found in the labs. However, I am now going to use Dradis to keep track of the same material. I am doing this to ease the development of reporting - Dradis is capable of creating reports from its database. This is going to be interesting since I have not used this tool before. I have been playing around with it for a couple of days so I have a lot of junk in the database. Since you are limited to one "project" at a time in Dradis-CE (community edition) I went on a hunt to find some way of being able to keep separate "project"s. When I get back into the OSCP labs again, I want to keep separate databases of the exercises, the lab notes, and the challenge notes.
I was able to find a set of commands to reset the database at https://dradisframework.com/ce/documentation/reset.html. I found out that using the following command
"bundle exec thor dradis:reset"
while in the Kali Linux directory /usr/lib/dradis, I could reset everything and have a backup of what I had put into the archive. So this led to a plan to keep things separate; I just have to remember to output a report of my findings before separating items out. The sequence of steps is as follows:
I may come back and update this information later.
I was able to find a set of commands to reset the database at https://dradisframework.com/ce/documentation/reset.html. I found out that using the following command
"bundle exec thor dradis:reset"
while in the Kali Linux directory /usr/lib/dradis, I could reset everything and have a backup of what I had put into the archive. So this led to a plan to keep things separate; I just have to remember to output a report of my findings before separating items out. The sequence of steps is as follows:
- reset the database with "bundle exec thor dradis:reset" in the /usr/lib/dradis directory; note the backup file in a README file in the /usr/lib/dradis directory, what it contains and the date.
- change the .xml file that is used for initial project setup
- create a new project using the .xml file
- do what you do; take notes, add attachments, etc.
- perform periodic backups of the data, in case of system failure
- when complete, or at various times during the note taking, put out a report
- finish up with a database reset (#1 above) and start over
I may come back and update this information later.
Tuesday, May 14, 2019
Hack Lab #3 - Install Additional VMs to Give an Attack Surface
I ended up installing additional VMs from VulnHub to give me some practice before I get back into the OSCP labs. I obtained the VMs from a list here and here. The second list is a file from NetSecFocus on Google Drive and includes a list of OSCP like VMs and ones from HackTheBox. The first ones that I installed were:
1. Kioptrix: Level 1 (#1): https://www.vulnhub.com/entry/kioptrix-level-1-1,22/
2. Kioptrix: Level 1.1 (#2): https://www.vulnhub.com/entry/kioptrix-level-11-2,23/
3. Kioptrix: Level 1.2 (#3): https://www.vulnhub.com/entry/kioptrix-level-12-3,24/
4. Kioptrix: Level 1.3 (#4): https://www.vulnhub.com/entry/kioptrix-level-13-4,25
5. Kioptrix: 2014: https://www.vulnhub.com/entry/kioptrix-2014-5,62/
6. FristiLeaks 1.3: https://www.vulnhub.com/entry/fristileaks-13,133/
7. Stapler 1: https://www.vulnhub.com/entry/stapler-1,150/
8. VulnOS 2: https://www.vulnhub.com/entry/vulnos-2,147/
9. SickOs 1.2: https://www.vulnhub.com/entry/sickos-12,144/
In addition, I installed the Kali VM from the OSCP class (new version based on Kali 2018.4 rolling).
Hack Lab #2 - Adding an OpenVPN Connection into the HomeLab
Strangely enough, I have a lot of equipment that is not being utilized all the time. One thing that I wanted to do was to have a VPN connection into the house that I could use when I am on travel. I just so happened to have a GL-AR300M laying around. I also have both a GL-USB150 and a GL-AR750S-EXT as travel routers that I take with me. I pretty much use the GL-USB150 to connect into my companies BYOD network. Since it is a simple usb device, and can do WiFi relay, I use it as the main router for side projects when I am at work. The GL-AR750S-EXT is also connected to my companies BYOD network, but is my main travel router when I am away. I decided to add an OpenVPN connection to my house.
The main instructions for doing this are located at https://docs.gl-inet.com/en/3/app/openvpn/ for the Server portion and https://docs.gl-inet.com/en/2/app/openvpn/ for the client. My server is going to be the GL-AR300M, I will attach it to an isolated vlan known as LAN5, and my client will be on the GL-AR750S-EXT. I first set up LAN5 vlan throughout the network to keep it separate from anything else. The LAN side of my server was connected to LAN5 and the WAN side was connected to my ISP router. Right now while I do testing, I will not have it on my ISPs Router DMZ. In fact I might isolate that out anyway. No need to expose any more ports than necessary. So the process is:
1. set up the server router in the home network
2. generate a .ovpn file using the GUI
3. download the .ovpn file (which is for the client)
4. at work, set up the client router
5. install the .ovpn file using the GUI
6. test out the connection
7. download the OpenVPN client to the personal laptop
8. install the .ovpn file on the personal laptop's OpenVPN client
9. test out the connection
Pretty simple, and it worked out just fine.
Hack Lab #1 - Installation of VMs on New Laptop with VirtualBox
So I went out and purchased a new laptop, an HP Pavillion, that I have been using as my travel personal laptop. I usually carry both my work laptop and a personal laptop when I go on TDY. I decided to try and setup a Hacking Lab on the new laptop using VirtualBox. This is a bit of a change for me since I normally have done everything using VMWare. However, I have heard good things about the VirtualBox package, and since it is free I decided to give it a shot. My version of VMWare Workstation is a bit out of date and I didn't want to spend the $140 or so to update it. I have had great success with using KVM on Ubuntu (http://linuxweenie.blogspot.com/2016/07/wow-amazing-find-to-convert-vmware-to.html).
I am doing this primarily to get back into preparation for the OSCP labs. I have been in the labs many times before, and I have taken the OSCP test but have not been completely successful at it. So, I have added the Kali Linux VM by doing the following:
1. download the Kali Linux VM from https://cdimage.kali.org/kali-2019.1a/kali-linux-2019.1a-amd64.iso
2. launch VirtualBox and install Kali from the iso by following instructions on the screen; make sure to select encrypted drive for extra security (the reason that I did not install from the VirtualBox image)
3. set up a shared directory with the personal laptop and the Kali VM
I did have some issues with having a shared directory between the Kali VM and the laptop until I followed the instructions at https://docs.kali.org/general-use/kali-linux-virtual-box-guest. I had forgotten that VMWare utilized not only the hypervisor parts but a small set of drivers that were loaded into the VM in order to perform all the functionality, including shared directories with the host. So the following resolved the issue:
apt-get update
apt-get install -y virtualbox-guest-x11
reboot
Tuesday, January 15, 2019
Project #15 - Add a Hacking Lab to the Network
As part of my studies in OSCP and CEH I have decided to add a hacking lab to my network. This should be protected from the outside and include many vulnerable VMs that I can practice on.
Subscribe to:
Posts (Atom)