- WiFi Bridge - this will be needed to connect the non-WiFi equipment, like the Edgerouter-12, to the WiFi network
- MQTT Server - this would provide an MQTT instance at the WiFi level on the ER12 router for some automation things
- Home Assistant Server - this would provide an HA instance through the ER12 router
- L2TP IPSec Endpoint - this would provide a connection for my laptops from anywhere in the community through the ER12 router
- Raspberry Pi WiFi Endpoint - L2TP IPSec GRE based endpoint that isolates the Ethernet connection of the RPi from the WiFi portion which runs over the campus WiFi network; it also allows a point to point connection between RPi endpoints with multiple networking protocols running over it on whatever vlans I desire; this might possibly be implemented by an RPi Zero W/USB plug
- Plex Server - this would provide Plex capability through the ER12 router
- NextCloud Server - this would provide file and project services through the ER12 router

This is a blog mostly about techie things, what I am doing to my apartment network on the cheap, IOT, 3D Printing, Raspberry Pis, Arduinos, ESP32, ESP8266, Home Automation, Personal Weather Stations, Things That Go Bump in the Night, and some side issues that need discussing. Remember, sometimes the journey to an end is as much fun as the goal achieved!
Friday, December 24, 2021
Possible Networking Changes in an All WiFi Environment
Since the retirement village will have only WiFi connection, there will be some things that I will need to add to make the setup easier for the future. It seems that I will be able to talk between devices over the WiFi network, including all over the campus. I am counting on this to be able to do some interesting network things. So there would need to be some of the following developed:
Thursday, December 23, 2021
Future Rack Setup
Background: I have a distributed HomeLab that I have built up over the years that I had become quite proud of. It allowed me to move equipment about the house and make changes as I needed as well as include new equipment that I purchase. This included at least 8 different vlans for different purposes, including separating media and IOT equipment. Equipment consisted of an Edgerouter-12, M4100-26g switch, five GS108Tv2/v3 managed switches throughout the house, Proxmox server (FX8320 w/16GB), Home assistant server (Zotec Atom D525), Mac Mini server, several Cameras, a couple of Edgerouter-Xs, and several Raspberry Pi’s performing different functions including interfacing a personal weather station. My main hobbies include working with the RPis and Arduino and doing various networking experiments (I’m an engineer by profession).
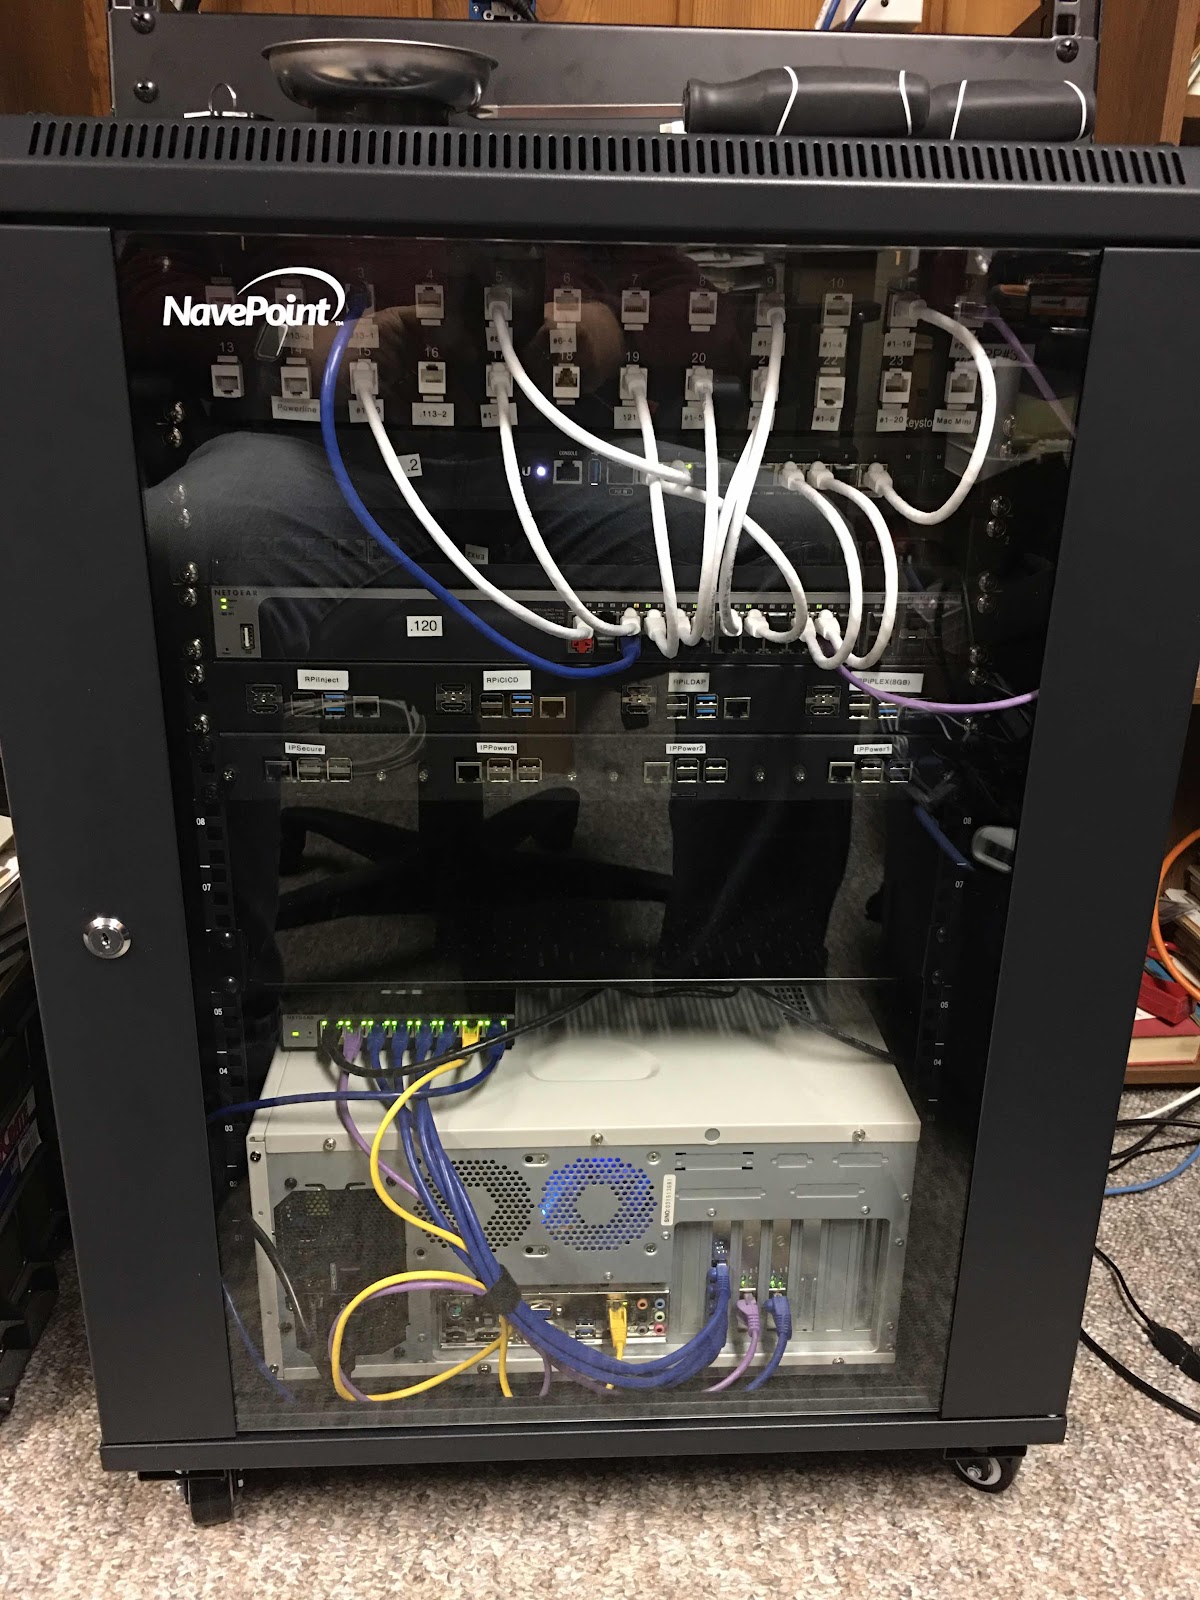
That is all changing now that I am downsizing into an apartment in a month. I’m moving into an environment that has wi-fi only (no Ethernet in the walls, so wi-if bridge for the rack), and no way to change out switches or door locks for automation. I am limiting myself to the one 15U rack and some plastic tubs for extra electronics to play with. So, currently the rack contains: an Edgerouter-12, an M4100-26g switch, one GS108Tv2 switch, the Proxmox server, two WD MyCloud NAS, and eight Raspberry Pi’s. The Proxmox server is in a regular desktop case laying on its side (soon to be put in a 2U case).
Other than rack mounting the Mac Mini, what other things can I set up for both now and in the future?
Project #25 - Changing the HomeLab for Retirement
I need to be able to convert my HomeLab equipment for transfer to the new Retirement apartment. The equipment around the house needs to be put into a rack with extra equipment relegated to some auxiliary tubs.
Saturday, October 30, 2021
New Direction - Moving into a Retirement Home
The more things stay the same, the more they change. We have recently decided to move into a retirement community near us and have placed a hold on one of the apartments there. This means a drastic reduction in my home network and what I am able to take with me to the new home. At this point we are still in the planning stages, but I will be downsizing considerably. I am not sure what this will mean to all of the activities that I have been involved with over the past several years.
I do know that there is a dramatic difference in networking capabilities where I am moving to versus what I enjoy doing at the moment. Rest assured, I will be taking my HomeLab with me to the new digs along with a bunch of the electronic gear that I have accumulated over the past several years. It doesn't make sense to take all of it however. I have resigned myself to only taking one rack worth of equipment plus four large plastic tubs full of other material. I have talked myself into this spartan arrangement for any future endeavors. Where I am going has a lot of activities that will take up my time, and I hope to be able to continue blogging with a purpose.
Sunday, September 19, 2021
Project #24 - Cover the House with WiFi - Implement a WAP in the Basement
There was some discussion about changing up the makeup of our home; during that time I decided to add an additional WiFi capability to the downstairs. I am still going to accomplish that. So far:
- I have done a WiFi survey throughout the house only to discover that there are portions of the house which have only a -80 dBm signal from the WAP in the living room; so an additional WAP would be necessary
- The WAP that I would use needs to be able to accommodate at least 4 VLAN/SSID combinations; my current WAP is a UniFi AP AC Pro where I am using four SSIDs
- I have decided that the best WAP to meet the need is the Unifi UAP-IW-HD-US which is an in-wall unit with an additional 4 ports on the bottom that can be used for other things; this unit actually has better range than my current one (but will be mounted under a steel beam which will mess with the signal straight up) and should be able to work seamlessly with the current unit
- I have purchased the Unifi UAP-IW-HD-US from my local MicroCenter along with a POE+ injector since I do not have POE+ switches
- I have decided to mount the unit outside the wall with an electrical outlet that mounts to the wall and has sufficient depth to allow an Ethernet cable to come through the side and be attached to the back of the WAP; I also will have the POE+ injector mounted at the same location downstairs
- I have moved the current WAP onto my Admin vlan since I consider the WAPs to be part of the network infrastructure; in that way I can close off all connection to the Admin vlan unless I need to change the architecture
- I have set up a temporary port on my Edgerouter-12 for testing the new WAP prior to changing the connection through my fiber optic cable which currently goes to an old Netgear router and will then be permanent
- I mounted the UAP-IW-HD on the wall downstairs, mounted a POE+ injector under it, connected Ethernet to my ER-12, and proceeded to check it out
- I resolved a couple of errors (not being on the same vlan with the controller was one) and then did a wifi survey. This seems to have cured the problem in the wifi throughout the house.
- I changed the vlans coming to the family room downstairs so that I can set up the UAP-IW-HD with the same ones plus others so that I have a complete setup.
- Rebooted the UAP-IW-HD, added a trunk out on port 1, and everything came up just fine. Project complete.
Thursday, July 29, 2021
NetUpdate #01 - Review of the Current State of the Network
As I sit here, now retired, I have been going over what components my network has and how I want to continue on with this HomeLab hobby. Whether I want to admit it or not I have decided that making changes to this network is a sort of hobby in and of itself. I enjoy trying out new things and making changes here and there to better how I use the network. Since I am now retired, I have time to do things that I have been putting off in the network, i.e. to completion. Currently I have a number of home network things that I want to incorporate, such as:
- Cover the entire house with wifi
- Bring in a Kanban board to be hosted on my HomeLab, instead of relying on Trello
- Make the Kanban board accessible from the outside by incorporating a VPN into the house
- Further isolate different portions of the network that do not need to be touching each other
- Have some built in redundancy in case things go south in the network
- Work up the security on the HomeLab, including isolation of an Admin vlan for the infrastructure
- Incorporate more Raspberry Pi units into the HomeLab that are on continuously
- Get back into Home Automation
- Get into CI/CD for developing software on the HomeLab
- Go with the Zero Trust Network theme throughout (encryption becomes important now)
These items will of course take time over the next few months and years to come. I am reasonably happy with how things have turned out so far.
Sunday, May 16, 2021
Tips #11 - Shorthand notation for network diagrams
The following are some example rules for diagram shorthand notation. This was developed to be able to not only indicate where the connections are, but to identify the ports on each end. Makes it easy to put a wiring list together.
- General Format: {port_from}[What_flow_contains]{port_to}
- Port designation: {device-port}
- {ONT} for Verizon ONT
- {SW1-5} for Switch#1, port 5
- {RT3-2} for Router#3, port 2
- {RT3-W} for Router#3, wan port
- {RPi05-D1} for Raspberry Pi #5, dongle on usb port 1
- {RPi05-E} for Raspberry Pi #5, ethernet port
- {PP1-15} for patch panel #1, port 15
- Flow designation: [non_tagged_vlan/Ttrunk_vlan_list]
- [32] for non-tagged vlan 32
- [T4,6,8] for tagged vlans 4, 6, and 8
- [12/T14,70] for non-tagged vlan 12 with tagged vlans 14 and 70
- [Trunk] for generic <defined elsewhere> trunk with tagged vlans; shorthand
Monday, April 26, 2021
Planning for a big change in the network
There have been some happenings going on at the house that might involve some additions. To that extent, the location of most of my networking equipment is probably going to change so that other work can be done to the older parts of the house. I am thinking of moving my main router and switch to the new addition and along with it, most of the Ethernet connections for the old portions of the house and the new portions of the house. I also have to bear in mind that I cannot use the main channel through the old part of the house anymore, I have to deal with other ways of getting the information through.
So, in retrospect, I am happy that I have learned some things about vlans, because they are going to become very handy in the near future unless I can find a different route for cabling. That being said, I am also going to have to pull Ethernet cables from locations where they are no longer esthetically appealing, meaning I can't just have cables dangling from the ceiling in my computer room because that room will probably go away. The rooms will change in what they are going to be used for. I am planning on moving my Tool Room elsewhere in the house to accommodate more space to do what I wish to do. Overall, I may end up with a box of Ethernet cables that I no longer need and go back to some shared trunk lines that make more sense.
I intend to have fun with these changes (should they happen) but at the same time I have to be conscious that the changes may have an affect on systems that I already have up and running.
Sunday, March 21, 2021
Tips #10 - Network Setup for Raspberry Pi Static Experiments
After some time working with Raspberry Pis (RPi) I have been able to figure out the kind of network setup that makes sense when you develop over a period of time. Here are some particulars of what I have found:
- Use of a Managed Switch with a trunk line to all of the vlans in the house saves a lot of running around.
- Use of Tasmota controlled extension cables can give you control of power to the RPis in case there are moments when you only want to concentrate on specific RPis for an experiment
- The managed switch on the desk where you wire up experiments gives you extra network connections when needed.
- The key is to be able to work on just what you want without having other thins on when you don’t need them to be on.
Tips #9 - The Sacrificial Port and Admin vlans
One thing I have discovered in my attempt to be secure is the use of Admin vlans. An Admin vlan is a vlan that you use to limit changes to your network. This is for internal network infrastructure protection. There are a couple of important points about this:
- Each router, Managed Switch, and Type 1 hypervisor that you have in your network is configured so that changes can only be made from the Admin vlan.
- All ACs/Rules setup in the network enforce the Admin vlan to be separate from all others and enforces the items in this list.
- You set up connections throughout the network so that you have to be physically connected to an Admin vlan port to make changes to any infrastructure elements in the network.
- We have a port on each device dedicated to the Admin vlan, but the Admin vlan is allowed to traverse between devices only on Trunk lines and those lines are physically protected as much as possible.
- All connections on the Admin vlan devices have to be encrypted; this is a zero trust approach.
- Encrypted Certs are controlled by a local Certificate Authority (CA) that is usually offline.
- The Admin vlan port is called the Sacrificial Port because that port is only used for the purpose of getting to the Admin vlan.
- The sacrificial port is protected with an 802.1x/Radius connection by MAC address; if you aren’t supposed to be there you shouldn’t be allowed to get in.
- The sacrificial Port is also there to make sure you can still control infrastructure devices if part of the network becomes unresponsive.
- The Sacrificial Port is also protected by a keyed Ethernet dust plug (suggest the color Red); key is necessary to take the plug out of the device.
Monday, March 15, 2021
Changeover of Ubuntu Server to Proxmox Box
I have been wanting to try my hand at a Type 1 hypervisor for a while but it was too expensive. I looked at ESXi, but decided that each change of the software meant a world of hurt for the VMs that would be running. I do like to use KVM and have wanted to learn LXC containers, so I decided to change out the Ubuntu Server and go with Proxmox.
I changed the HW for the Proxmox server to have a 1TB SSD, repurposed the 4TB spinner from the Ubuntu Server to use, and reconnected the DVD drive. I did a fresh install from the Proxmox 6.3-1 iso that I downloaded from the site and came up running very quickly. I then added a number of OS isos, including CentOS, Ubuntu, and Fedora. I was able to quickly spin up Ubuntu and start working on the challenge of other VMs and LXCs.
I connected the GUI/SSH port of the Proxmox to my admin vlan and ran the first Ubuntu VM on my Pers vlan. So far so good.
Sunday, February 21, 2021
HW #1 - TiVo over MoCA Peculiarities
Over time, I have learned some peculiarities about the TiVo system:
- When I originally used the TiVo Bolt with a couple of TiVo Minis, I had all connections over Ethernet. That worked out fine, but I did discover that the Minis did not let go of their tuners which resulted in an enormous amount of traffic over the ethernet lines. Even placing the equipment on a separate vlan only partially solved the problem.
- Early on you were able to select the TiVo button on the Minis and cause the Mini to release its hold on the TiVo Bolt tuner.
- When I had the equipment blow out due to a power surge, I opted to get the TiVo Edge. Updating the Edge and the Minis brought me into a condition in which I was unable to release the Minis from the Edge tuner. I have since learned that they changed the TiVo Minis and thus they might be able to release the tuners somehow.
- Because of the amount of traffic for the TiVos on Ethernet, I decided to run the connections over MoCA. I have a Verizon FIOS ONT that I connect to and ended up putting the Edge and the Minis on channel 15 in order to get it to work. This was acceptable and now the traffic between the Minis and the Edge are isolated from my Ethernet, or so I thought.
- Since I needed to setup the TiVo Edge as a MoCA bridge, I was surprised to learn that the Ethernet connection to the Edge was absolutely hammering the unmanaged Ethernet switch it was plugged into. This is to be expected since apparently the TiVo minis do not go directly to the TiVo Edge but actually go out the bridge, bounce off of the Ethernet switch and back to the TiVo Edge. Normally, only the port that the TiVo Edge is plugged into shows any traffic (flashing LED). Without the Ethernet switch, there would be a lot of traffic to deal with.
Friday, February 19, 2021
Tips #8 - Using a Router as an Access Point with Multiple SSIDs
In the course of helping someone out on Reddit about their setup, it occurred to me that there have been multiple instances of people asking about using an old router as an access point. It also helps if you consider the advice peppered with multiple VLANs and multiple SSIDs. Lets assume you have a Wi-Fi router and want to use another router as an access point (lets call it AP). Further, lets assume that you have two VLANs you wish to use. Here are some things to consider (not in any particular order):
- You probably will want to do a Wi-Fi survey to see where your neighbors are parked on the Wi-Fi spectrum and figure out from there how you want to minimize interference - I recommend Acrylic Wi-Fi as the tool to use, there is a free version. There are also some tools under Kali Linux as well.
- If you have a mobile device, you will generally want to seamlessly switch between Wi-Fi sources. To do this, you are going to want to have the Wi-Fi router and AP on different Wi-Fi channels. So, as a general rule walking around your house will cause your cell phone to connect to the Wi-Fi source with the strongest signal. If on the other hand the one SSID is on the same Wi-Fi channel on both devices you could wind up with them interfering with each other.
- We will assume you have VLANs that you are using to separate the networks.
- I make it a point to have different SSIDs based on the vlan it is connected to, so if you have 2 VLANs, you should use 2 SSIDs (different names).
- Always make sure that the SSIDs have the same passphrase across the devices, but use two different passphrases for two different SSIDs. Then the SSIDs will be cryptographically separate from each other.
- Most smart home devices will use the 2.4GHz spectrum, rarely will you see it connect to 5.4GHz, so you could in effect only need the 2.4GHz spectrum for the smart devices and that may influence your choice for how you set up each SSID.
- If you have smart TVs, I would try to use Ethernet as much as is possible to connect them; video chews up a lot of Wi-Fi bandwidth.
- Don't setup the AP in bridge mode; that implies that you are going through the WAN port. There is no need to do that if you are using it as an access point. Connect the cable from a port on LAN side of the router to one of the ports on the Linksys LAN side. This cable should be designated as a trunk line, i.e. it will be carrying multiple VLANs. By doing it that way, you will keep the one SSID to one vlan mantra unaltered. Setup the VLANs accordingly.
- In the AP vlan setup do not setup a DHCP server, but use a DHCP relay mode instead, and point the relay address to the router vlan IP address. That way a connection to the AP will use the router to get it's IP address (which also means it will get it's DNS info from the same source).
This is simple but effective and I have used this approach many times to success.
Wednesday, February 17, 2021
Zone Based Routing and the Edgerouter-X
I am attempting to use an Edgerouter-X (ERX1 for short) to provide specific, controlled access between vlans and certain equipment. The first use case will be entirely composed of port forwarding, but between multiple vlans. First case is to define what I mean by setup:
The New Setup for vlans on ERX1
- ERX1-1 will be connected to Media Router for access to the Media vlan
- ERX1-2 will be connected to Main Switch for access to the Admin vlan for configuration
- ERX1-5 will be connected to Main Switch for access to other vlans as a trunk line
- ERX1 vlans will be setup as normal, always getting IP from DHCP and doing DHCP Remote to keep the gateways pure
The following Zones will be defined:
- Local (ERX1 itself)
- Admin
- Media
- Personal
- IOT
- LAN3
- DMZ
The following special defined accesses are:
- Port 8123 of the HA-IOT server on IOT vlan <-> every IP on LAN3 vlan
- HA-IOT server on IOT vlan <-> data server ports on Personal vlan
- ports for Plex server on Personal vlan <-> every IP on the Media vlan
- ports for Plex server on Personal vlan <-> every IP on the LAN3 vlan
- every IP on the Media vlan <-> data server ports on Personal vlan
- Docker container ports in the Development vlan <-> the MQTT server on the HA-IOT server in the LAN3 vlan
- every IP on the LAN3 vlan <-> Media equipment ports on the Media vlan
- specific IPs on the DMZ <-> data server ports on Personal vlan
- Some of these alternate connections are going to require the device to be on the same subnet
Group Definitions needed:
- port 8123 on HA-IOT Server on IOT vlan
- data server ports on Personal vlan
- Plex server ports on Personal vlan
- MQTT server port on IOT vlan
- Media equipment ports on Media vlan
- Specific IPs on the DMZ vlan
The first items on the ERX1 that need to be completed for setup include resetting the ERX1 to default, setting up an initial default router setup with two subnets, defining the Admin vlan, setting up the main switch to accommodate connection to the Admin vlan and to the Media vlan (with the WAN port). From there I should be able to update the ERX1 as I go.
Sunday, February 14, 2021
Project #23 - What Makes Sense to ChangeUp in the Network?
What makes sense in the changeup of my network?
I do have a problem in the way that things are partitioned:
1. vlans are just that, they are setup to not have connection to each other. This is by design, and I went out of my way when I setup my Edgerouter-12 to force vlan isolation even though by default vlans can talk to each other.
2. I actually setup some vlans so that the elements in those vlans would only be able to talk outside the router to the internet and not to each other. This was a security design.
3. I made sure that vlans that were isolated to other vlans were not able to modify any of the settings on my Edgerouter-12 except for the admin vlan. This was a security design.
4. I have a couple of specific computers that are allowed to contact other vlans. This was by design and allows me to monitor equipment as necessary without having to give all my equipment the same level of access. This was a security design.
5. The above way of partitioning has resulted in some problems with being able to get to certain servers. I actually need the following:
- I need to be able to get to port 8123 of my HA-IOT server, on the IOT vlan, from the LAN3 vlan which contains my iPhones, iPads, and laptops.
- My HA-IOT server needs to get to the data servers in the Server vlan
- My Plex server resides in the Server vlan and both the Media and the LAN3 vlan need to get to it
- My Media equipment needs to get to the data servers in the Server vlan
- For testing purposes I need to have some Docker containers in the Development vlan be able to get to the MQTT server on the HA-IOT server in the LAN3 vlan
- My iPhones, iPads, and laptops on the LAN3 vlan need to be able to get to Media equipment on the Media vlan
- Some of these alternate connections are going to require the device to be on the same subnet
So, this means that there needs to be overlap between the different vlans, but at the same time it needs to be controlled. I do have an additional Edgerouter-X which I can use for that purpose. This will be an exploration of what I can accomplish. This Edgerouter-X will not be used as a normal router, but will in fact be the way that I can provide a controlled interface between vlans. If the router is removed, then everything will go back to the way it was before. This will also give me a chance to try out zone based routing on the Edgerouter-X.
Friday, February 12, 2021
Patch Panel Connections
DwnFR DwnBRM Attic Kitchen LftFire
+------+ (3) +------+ +------+ +-------+ (2) +-----------+ (4)
| PP#4 +---------+ PP#5 | | PP#9 | | PP#12 | +----------+ PP#6 +----------+
+--+---+ +--+---+ +--+---+ +-+-----+ | +--+--------+ |
| | | | | | | SideRm
| | | |(1) | +------+ +---+---+
| | | | | | | PP#10 |
|(1) |(1) |(1) | | | RtFire +---+---+
| | | | | | +------+ (3) |
| | | | | | | PP#7 +----------+
| | | | | | +------+
| | | | | |
| +----+-----------+----------+-----------------+-+ |(2)
+-----------+ PP#1 | |
+-+-----------+------------------+------------+-+ |
| | Toolroom | | |
|(1) | | | |
| | |(5) |(1) |
+----+--+ |(9) | | |
Hutch | PP#11 | | +--+---+ +---+------+-+
+----+--+ | | PP#2 | | PP#8 |
| | +--+---+ +---+--------+
|(2) | Outtool | |
| | | |
| | | |
| | | |
| | |(1) |(3)
| | | | Table
+-+-----------+------------------+------------+-+ (3) +-------+
| PP#3 +----------+ PP#13 |
+-----------------------------------------------+ +-------+
Rack
Diagram completed at http://asciiflow.com/. Rectangles are patch panels, connecting lines have the number of Ethernet cables between.
Sunday, January 17, 2021
Edgerouter-12 setup for isolated Home-Assistant and IOT vlan
Here is the cli firewall setup that I decided to use on my Edgerouter-12 (ER-12) to isolate the vlan for my home-assistant and IOT equipment. This equipment is setup to work within my local network. You still need a DHCP service defined on the ER-12, unless it comes from an external source. The basics are:
- the HA-IOT are allowed to access the internet, they need this to connect to the Wyze servers
- the HA-IOT can access each other on the vlan
- the HA-IOT can be accessed by specific laptops located on different vlans
- the HA-IOT are not allowed to modify configuration on the Edgerouter-12 but can get their DNS and DHCP services from the ER-12
- the HA-IOT are not allowed to access any other vlan on the ER-12
- other specific vlans are allowed to access the home-assistant server at the 8123 port (not implemented yet)
First we need a Group of addresses for the RFC-1918 private addresses, control laptops, printer, and the HA-IOT vlan addresses:
set firewall group address-group RFC-1918_GROUP address 192.168.0.0/16
set firewall group address-group RFC-1918_GROUP address 172.16.0.0/12
set firewall group address-group RFC-1918_GROUP address 10.0.0.0/8
set firewall group address-group RFC-1918_GROUP description 'RFC-1918 Group'
set firewall group address-group CONTROL_LAPTOP address <control_laptop_1_IP>
set firewall group address-group CONTROL_LAPTOP address <control_laptop_2_IP>
set firewall group address-group CONTROL_LAPTOP description 'Laptop used for Admin on Network'
set firewall group address-group PRINTER address <printer_IP>
set firewall group address-group PRINTER description 'Printer IP on Network'
set firewall group network-group HA-IOT_GROUP description 'ip addresses in HA-IOT vlan'
set firewall group network-group HA-IOT_GROUP network <HA-IOT_vlan_address_range>/24
Next we need a vif off of switch0 for our vlan:
set interfaces switch switch0 vif <HA-IOT_vlan_tag> address <router_address_on_HA-IOT_vlan>/24
set interfaces switch switch0 vif <HA-IOT_vlan_tag> description HA-IOT
set interfaces switch switch0 vif <HA-IOT_vlan_tag> firewall in name HA-IOT_IN
set interfaces switch switch0 vif <HA-IOT_vlan_tag> firewall local name HA-IOT_LOCAL
set interfaces switch switch0 vif <HA-IOT_vlan_tag> firewall out name HA-IOT_OUT
set interfaces switch switch0 vif <HA-IOT_vlan_tag> ip enable-proxy-arp
The rules for traffic from our HA-IOT vlan to the ER-12 [HA-IOT_IN]:
set firewall name HA-IOT_IN default-action accept
set firewall name HA-IOT_IN description 'Guest In'
set firewall name HA-IOT_IN rule 10 action accept
set firewall name HA-IOT_IN rule 10 description 'accept established and related'
set firewall name HA-IOT_IN rule 10 log disable
set firewall name HA-IOT_IN rule 10 protocol all
set firewall name HA-IOT_IN rule 10 state established enable
set firewall name HA-IOT_IN rule 10 state invalid disable
set firewall name HA-IOT_IN rule 10 state new disable
set firewall name HA-IOT_IN rule 10 state related enable
set firewall name HA-IOT_IN rule 20 action reject
set firewall name HA-IOT_IN rule 20 description 'reject invalid packets'
set firewall name HA-IOT_IN rule 20 log disable
set firewall name HA-IOT_IN rule 20 protocol all
set firewall name HA-IOT_IN rule 20 state established disable
set firewall name HA-IOT_IN rule 20 state invalid enable
set firewall name HA-IOT_IN rule 20 state new disable
set firewall name HA-IOT_IN rule 20 state related disable
set firewall name HA-IOT_IN rule 30 action accept
set firewall name HA-IOT_IN rule 30 description 'allow printer'
set firewall name HA-IOT_IN rule 30 destination group address-group PRINTER
set firewall name HA-IOT_IN rule 30 log disable
set firewall name HA-IOT_IN rule 30 protocol all
set firewall name HA-IOT_IN rule 30 source group address-group CONTROL_LAPTOP
set firewall name HA-IOT_IN rule 40 action accept
set firewall name HA-IOT_IN rule 40 description 'accept HA-IOT traffic'
set firewall name HA-IOT_IN rule 40 destination group network-group HA-IOT_GROUP
set firewall name HA-IOT_IN rule 40 log disable
set firewall name HA-IOT_IN rule 40 protocol all
set firewall name HA-IOT_IN rule 50 action drop
set firewall name HA-IOT_IN rule 50 description 'Block RFC-1918 Traffic'
set firewall name HA-IOT_IN rule 50 destination group address-group RFC-1918_GROUP
set firewall name HA-IOT_IN rule 50 log disable
set firewall name HA-IOT_IN rule 50 protocol all
The rules for traffic from our HA-IOT vlan to the ER-12 itself (DNS, DHCP, other services) [HA-IOT_LOCAL]:
set firewall name HA-IOT_LOCAL default-action drop
set firewall name HA-IOT_LOCAL description 'Guest Local'
set firewall name HA-IOT_LOCAL rule 10 action accept
set firewall name HA-IOT_LOCAL rule 10 description 'accept established and related'
set firewall name HA-IOT_LOCAL rule 10 log disable
set firewall name HA-IOT_LOCAL rule 10 protocol all
set firewall name HA-IOT_LOCAL rule 10 state established enable
set firewall name HA-IOT_LOCAL rule 10 state invalid disable
set firewall name HA-IOT_LOCAL rule 10 state new disable
set firewall name HA-IOT_LOCAL rule 10 state related enable
set firewall name HA-IOT_LOCAL rule 20 action reject
set firewall name HA-IOT_LOCAL rule 20 description 'reject invalid packets'
set firewall name HA-IOT_LOCAL rule 20 log disable
set firewall name HA-IOT_LOCAL rule 20 protocol all
set firewall name HA-IOT_LOCAL rule 20 state established disable
set firewall name HA-IOT_LOCAL rule 20 state invalid enable
set firewall name HA-IOT_LOCAL rule 20 state new disable
set firewall name HA-IOT_LOCAL rule 20 state related disable
set firewall name HA-IOT_LOCAL rule 30 action accept
set firewall name HA-IOT_LOCAL rule 30 description 'Allow DHCP'
set firewall name HA-IOT_LOCAL rule 30 destination port 67
set firewall name HA-IOT_LOCAL rule 30 log disable
set firewall name HA-IOT_LOCAL rule 30 protocol udp
set firewall name HA-IOT_LOCAL rule 30 source port 68
set firewall name HA-IOT_LOCAL rule 40 action accept
set firewall name HA-IOT_LOCAL rule 40 description 'Allow DNS'
set firewall name HA-IOT_LOCAL rule 40 destination port 53
set firewall name HA-IOT_LOCAL rule 40 log disable
set firewall name HA-IOT_LOCAL rule 40 protocol tcp_udp
The rules for traffic from the ER-12 to our HA-IOT vlan [HA-IOT_OUT]:
set firewall name HA-IOT_OUT default-action accept
set firewall name HA-IOT_OUT description 'Guest Out'
set firewall name HA-IOT_OUT rule 10 action accept
set firewall name HA-IOT_OUT rule 10 description 'accept established and related'
set firewall name HA-IOT_OUT rule 10 log disable
set firewall name HA-IOT_OUT rule 10 protocol all
set firewall name HA-IOT_OUT rule 10 state established enable
set firewall name HA-IOT_OUT rule 10 state invalid disable
set firewall name HA-IOT_OUT rule 10 state new disable
set firewall name HA-IOT_OUT rule 10 state related enable
set firewall name HA-IOT_OUT rule 20 action reject
set firewall name HA-IOT_OUT rule 20 description 'reject invalid packets'
set firewall name HA-IOT_OUT rule 20 log disable
set firewall name HA-IOT_OUT rule 20 protocol all
set firewall name HA-IOT_OUT rule 20 state established disable
set firewall name HA-IOT_OUT rule 20 state invalid enable
set firewall name HA-IOT_OUT rule 20 state new disable
set firewall name HA-IOT_OUT rule 20 state related disable
set firewall name HA-IOT_OUT rule 40 action accept
set firewall name HA-IOT_OUT rule 40 description 'accept HA-IOT traffic'
set firewall name HA-IOT_OUT rule 40 log disable
set firewall name HA-IOT_OUT rule 40 protocol all
set firewall name HA-IOT_OUT rule 40 source group network-group HA-IOT_GROUP
set firewall name HA-IOT_OUT rule 50 action drop
set firewall name HA-IOT_OUT rule 50 description 'Drop Non-Guest Traffic'
set firewall name HA-IOT_OUT rule 50 log disable
set firewall name HA-IOT_OUT rule 50 protocol all
set firewall name HA-IOT_OUT rule 50 source group address-group RFC-1918_GROUP
Edgerouter-12 setup for completely isolated camera vlan
Here is the cli firewall setup that I decided to use on my Edgerouter-12 (ER-12) to isolate the vlan for my cameras. You still need a DHCP service defined on the ER-12, unless it comes from an external source. The basics are:
- the cameras are allowed to access the internet, they need this to connect to the Wyze servers
- the cameras cannot access each other on the vlan
- the cameras are not allowed to modify configuration on the Edgerouter-12 but can get their DNS and DHCP services from the ER-12
- the cameras are not allowed to access any other vlan on the ER-12
- this ruleset is patterned after a normal Guest vlan with limited access
First we need a Group of addresses for the RFC-1918 private addresses:
set firewall group address-group RFC-1918_GROUP address 192.168.0.0/16
set firewall group address-group RFC-1918_GROUP address 172.16.0.0/12
set firewall group address-group RFC-1918_GROUP address 10.0.0.0/8
set firewall group address-group RFC-1918_GROUP description 'RFC-1918 Group'
Next we need a vif off of switch0 for our vlan:
set interfaces switch switch0 vif <camera_vlan_tag> address <router_address_on_camera_vlan>/24
set interfaces switch switch0 vif <camera_vlan_tag> description Cameras
set interfaces switch switch0 vif <camera_vlan_tag> firewall in name CAMERA_IN
set interfaces switch switch0 vif <camera_vlan_tag> firewall local name CAMERA_LOCAL
set interfaces switch switch0 vif <camera_vlan_tag> firewall out name CAMERA_OUT
set interfaces switch switch0 vif <camera_vlan_tag> ip enable-proxy-arp
The rules for traffic from our camera vlan to the ER-12 [CAMERA_IN]:
set firewall name CAMERA_IN default-action accept
set firewall name CAMERA_IN description 'Guest In'
set firewall name CAMERA_IN rule 10 action accept
set firewall name CAMERA_IN rule 10 description 'accept established and related'
set firewall name CAMERA_IN rule 10 log disable
set firewall name CAMERA_IN rule 10 protocol all
set firewall name CAMERA_IN rule 10 state established enable
set firewall name CAMERA_IN rule 10 state invalid disable
set firewall name CAMERA_IN rule 10 state new disable
set firewall name CAMERA_IN rule 10 state related enable
set firewall name CAMERA_IN rule 20 action reject
set firewall name CAMERA_IN rule 20 description 'reject invalid packets'
set firewall name CAMERA_IN rule 20 log disable
set firewall name CAMERA_IN rule 20 protocol all
set firewall name CAMERA_IN rule 20 state established disable
set firewall name CAMERA_IN rule 20 state invalid enable
set firewall name CAMERA_IN rule 20 state new disable
set firewall name CAMERA_IN rule 20 state related disable
set firewall name CAMERA_IN rule 30 action drop
set firewall name CAMERA_IN rule 30 description 'Block RFC-1918 Traffic'
set firewall name CAMERA_IN rule 30 destination group address-group RFC-1918_GROUP
set firewall name CAMERA_IN rule 30 log disable
set firewall name CAMERA_IN rule 30 protocol all
The rules for traffic from our camera vlan to the ER-12 itself (DNS, DHCP, other services) [CAMERA_LOCAL]:
set firewall name CAMERA_LOCAL default-action drop
set firewall name CAMERA_LOCAL description 'Guest Local'
set firewall name CAMERA_LOCAL rule 10 action accept
set firewall name CAMERA_LOCAL rule 10 description 'accept established and related'
set firewall name CAMERA_LOCAL rule 10 log disable
set firewall name CAMERA_LOCAL rule 10 protocol all
set firewall name CAMERA_LOCAL rule 10 state established enable
set firewall name CAMERA_LOCAL rule 10 state invalid disable
set firewall name CAMERA_LOCAL rule 10 state new disable
set firewall name CAMERA_LOCAL rule 10 state related enable
set firewall name CAMERA_LOCAL rule 20 action reject
set firewall name CAMERA_LOCAL rule 20 description 'reject invalid packets'
set firewall name CAMERA_LOCAL rule 20 log disable
set firewall name CAMERA_LOCAL rule 20 protocol all
set firewall name CAMERA_LOCAL rule 20 state established disable
set firewall name CAMERA_LOCAL rule 20 state invalid enable
set firewall name CAMERA_LOCAL rule 20 state new disable
set firewall name CAMERA_LOCAL rule 20 state related disable
set firewall name CAMERA_LOCAL rule 30 action accept
set firewall name CAMERA_LOCAL rule 30 description 'Allow DHCP'
set firewall name CAMERA_LOCAL rule 30 destination port 67
set firewall name CAMERA_LOCAL rule 30 log disable
set firewall name CAMERA_LOCAL rule 30 protocol udp
set firewall name CAMERA_LOCAL rule 30 source port 68
set firewall name CAMERA_LOCAL rule 40 action accept
set firewall name CAMERA_LOCAL rule 40 description 'Allow DNS'
set firewall name CAMERA_LOCAL rule 40 destination port 53
set firewall name CAMERA_LOCAL rule 40 log disable
set firewall name CAMERA_LOCAL rule 40 protocol tcp_udp
The rules for traffic from the ER-12 to our camera vlan [CAMERA_OUT]:
set firewall name CAMERA_OUT default-action accept
set firewall name CAMERA_OUT description 'Guest Out'
set firewall name CAMERA_OUT rule 10 action accept
set firewall name CAMERA_OUT rule 10 description 'accept established and related'
set firewall name CAMERA_OUT rule 10 log disable
set firewall name CAMERA_OUT rule 10 protocol all
set firewall name CAMERA_OUT rule 10 state established enable
set firewall name CAMERA_OUT rule 10 state invalid disable
set firewall name CAMERA_OUT rule 10 state new disable
set firewall name CAMERA_OUT rule 10 state related enable
set firewall name CAMERA_OUT rule 20 action reject
set firewall name CAMERA_OUT rule 20 description 'reject invalid packets'
set firewall name CAMERA_OUT rule 20 log disable
set firewall name CAMERA_OUT rule 20 protocol all
set firewall name CAMERA_OUT rule 20 state established disable
set firewall name CAMERA_OUT rule 20 state invalid enable
set firewall name CAMERA_OUT rule 20 state new disable
set firewall name CAMERA_OUT rule 20 state related disable
set firewall name CAMERA_OUT rule 30 action drop
set firewall name CAMERA_OUT rule 30 description 'Drop Non-Guest Traffic'
set firewall name CAMERA_OUT rule 30 log disable
set firewall name CAMERA_OUT rule 30 protocol all
set firewall name CAMERA_OUT rule 30 source group address-group RFC-1918_GROUP
Thursday, January 7, 2021
Thinking of making the IOT network self contained
It occurred to me that at some time in the future, I might have problems with my network again. But this time I will probably be more dependent on the elements of the network since I am highly dependent on the router providing DHCP IP addresses and the WAP providing the wifi connection for other elements that require support. I now think it would be wise to be able to isolate my HA-IOT network from the other part of my network, and still be able to have it work if things happen. Since I use an Atom based computer for the Home-assistant and MQTT base, I might be able to use that to provide both a WAP and a DHCP/DNS server for the network. If I do that the wifi port can provide connection for the wifi components, the z-wave adapter for the z-wave components, and if the DHCP/DNS server extends to the HA-IOT vlan as it's control, I don't have to depend upon the router to give me those elements. If I go on a trip, I can cut off everything else and still have the HA-IOT network working as it needs to be. Since it is on an UPS, it won't be going down anytime soon. I just have to figure out how to accomplish this on the Atom processor.
Update: over the weekend 1/9 - 10/2021, I modified the HA-IOT vlan to be completely isolated from other vlans, but at the same time able to communicate within the vlan itself. It is also isolated from modifying the router or any other switch component in the network. I am also thinking of changing the bandwidth to the internet to something that is below video capability. My cameras are on a separate vlan which is isolated from everything due to their nature of using an external server.
Subscribe to:
Posts (Atom)