I was able to complete the TOR proxy that I wanted to put together. I first followed the instructions at http://learn.adafruit.com/setting-up-a-raspberry-pi-as-a-wifi-access-point/ to get one of the RPis to work as an access point. I then started following the instructions at http://learn.adafruit.com/onion-pi to get the TOR proxy working. I reset my managed switch to have a port open to the outside (my
psuedo-DMZ), plugged in the RPi, and restarted it. I was able to check
it out using http://www.ipchicken.com and found that my ip was coming from the output of a TOR relay. Success ...
I have also opened an identical port to the outside in the third switch that I have in the house. In that way, I am able to move the TOR proxy from one part of the house to the other.

This is a blog mostly about techie things, what I am doing to my apartment network on the cheap, IOT, 3D Printing, Raspberry Pis, Arduinos, ESP32, ESP8266, Home Automation, Personal Weather Stations, Things That Go Bump in the Night, and some side issues that need discussing. Remember, sometimes the journey to an end is as much fun as the goal achieved!
Wednesday, June 19, 2013
Monday, June 17, 2013
Thinking of some Proxy add-ons
The TOR proxy seems like a good idea for using a spare RPi. I wouldn't do it if its your only RPi though. Too much of a chance that you will just keep using it over and over. I was thinking of adding a second wireless adapter and making it a wireless-to-wireless proxy instead of a wireless-to-ethernet proxy. In fact I was also thinking of adding a second ethernet to allow a connection via a ethernet switch to the LAN side of the proxy. Then what I would have would be a wireless access port, with the capability of connecting either through a wireless adapter or ethernet on the WAN side and wireless and/or ethernet on the LAN side. I would also want to be able to use shorewall to manipulate the capabilities a little better. Although the Adafruit instructions create a nat firewall that is adequate, I would still like to have a finer resolution on what I will allow. I wonder if this would be a good fit for the 2x16 LCD screen with buttons from Adafruit that I have to be able to set up the correct connections from. Maybe something like this:

In addition, I could use CURL to access the internet through my companies Guest account. There is a Cisco Web Authentication component, hence the need for CURL to authenticate prior to connection. The connection would be something like:
OP=`curl -k -d "buttonClicked=4" -d "err_flag=0" -d "info_flag=0" -d "username=guestname" -d "password=guestpassword" https://wirelesssubdomain.mycompany.com/login.html`;
That would be a very useful item at work and at home. Hmmmm. I have to think some more about this.

In addition, I could use CURL to access the internet through my companies Guest account. There is a Cisco Web Authentication component, hence the need for CURL to authenticate prior to connection. The connection would be something like:
OP=`curl -k -d "buttonClicked=4" -d "err_flag=0" -d "info_flag=0" -d "username=guestname" -d "password=guestpassword" https://wirelesssubdomain.mycompany.com/login.html`;
That would be a very useful item at work and at home. Hmmmm. I have to think some more about this.

The TOR Proxy is Now Running
Well after some false starts and puzzlements, I was able to complete the TOR proxy that I wanted to put together. I first followed the instructions at http://learn.adafruit.com/setting-up-a-raspberry-pi-as-a-wifi-access-point/ to get one of the RPis to work as an access point. The problem that I was having was getting the hostapd to recognize the wireless adapter that I was using. I tried three different wireless adapters (having gone to Staples to get the third) and could not get them to work. When I tried looking through the logs with dmesg, I could see that the adapter was recognized and a driver was immediately launched, but hostapd was not able to work with it even though I put the name of the driver that was launched in the configuration file. Then it dawned on me that having the driver name in the hostapd.conf file might mean that it was trying to install the driver. So I removed it. When I did, hostapd started working correctly. All I can figure out is that I had updated the system and possibly the new version of the system automatically loaded a driver each time it got an adapter that it recognized.
I finished up the install and was able to get the RPi to work as a wi-fi access point, with a simple firewall and nat setup and the other connection through the ethernet port. I then started following the instructions at http://learn.adafruit.com/onion-pi to get the TOR proxy working. The instructions do not have you rebooting the RPi at particular intervals, and that turned out to be the problem child. As soon as I rebooted to a known state, my setup started working as advertised. I reset my managed switch to have a port open to the outside (my psuedo-DMZ), plugged in the RPi, and restarted it. I was able to check it out using http://www.ipchicken.com and found that my ip was coming from the output of a TOR relay. Success ... here is a picture of the finished product for what it is worth.
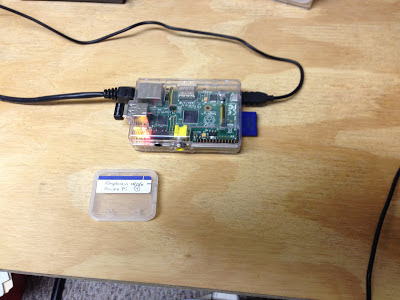
I finished up the install and was able to get the RPi to work as a wi-fi access point, with a simple firewall and nat setup and the other connection through the ethernet port. I then started following the instructions at http://learn.adafruit.com/onion-pi to get the TOR proxy working. The instructions do not have you rebooting the RPi at particular intervals, and that turned out to be the problem child. As soon as I rebooted to a known state, my setup started working as advertised. I reset my managed switch to have a port open to the outside (my psuedo-DMZ), plugged in the RPi, and restarted it. I was able to check it out using http://www.ipchicken.com and found that my ip was coming from the output of a TOR relay. Success ... here is a picture of the finished product for what it is worth.

Saturday, June 15, 2013
Trying to make a TOR Proxy
It looks like Adafruit came out with a tutorial on "Onion Pi". This is a TOR proxy for the Raspberry Pi. TOR is an anonymizing network. A lot of people have been showing interest in TOR since the issue with the NSA looking into people's information like email and phone calls came to light. I am just interested in the proxy because of the security aspects of it, since I am in the security game now. So later tonight I will go through the instructions.
-- LW
-- LW
Monday, May 27, 2013
Music via midi?
Maybe I have added too many things that I am interested in pursuing with the RPis in my possession. However in one of the conversations with people that I work with, I now have become interested I working with the RPi in developing some midi applications, or at least using some already developed applications on the RPi. I do posses some vintage midi gear that would come in handy here. I have a DW8000 synthesizer, a Ground Control midi foot controller, a GMan sound module, a SQD-8 midi recorder, a TR-505 drum machine, a smaller midi controller keyboard, and a TR-1 midi thru repeater plus assorted midi cables to make it all work together. Anyway, this shows that I have made some investment in midi gear and probably means that I should try and resurrect my keyboard abilities which if I remember correctly were sadly lacking back in the day.
I also have some midi related apps on my iPad which could be useful. I already have a handle on the use of some Linux based midi applications including Jack and some decent sequencers. I need to figure this one out. Then again, maybe I should just stick to what I have been planning with the robot.
Maybe a pitch to midi converter via the RPi? That would be an interesting use of the RPi technology. Then you could use the RPi to interface to a guitar and play it through a midi setup or sound module. It would only take some fancy FFT processing and some comb filtering to accomplish. Off turnings could be a problem though.
I also have some midi related apps on my iPad which could be useful. I already have a handle on the use of some Linux based midi applications including Jack and some decent sequencers. I need to figure this one out. Then again, maybe I should just stick to what I have been planning with the robot.
Maybe a pitch to midi converter via the RPi? That would be an interesting use of the RPi technology. Then you could use the RPi to interface to a guitar and play it through a midi setup or sound module. It would only take some fancy FFT processing and some comb filtering to accomplish. Off turnings could be a problem though.
Sunday, May 26, 2013
Project #7 - Add a TOR Gateway to the Network
As part of experimentation throughout the network, I would like to add a TOR gateway on a Raspberry Pi to push information over the TOR network.
Saturday, May 25, 2013
Figured out how to make a set of tagged vlans from the Mac Mini
I was successful in determining how to set up the connection between two managed switches in my network to be a trunk with multiple tagged vlans. I thought it might be nice to figure out how to have a trunk from my Mac Mini to one of my managed switches with the same capability. I did determine how to add a port connection to a different vlan from the Mac via a USB to Ethernet adapter. I decided to take the idea one step further and get a Thunderbolt to Gigabit Ethernet adapter for the purpose of getting the most speed out of the trunk line. I plugged the adapter into Mac and fed an ethernet cable from the closest managed switch. I then gave the adapter a fixed ip address in the home network range (same as the Mac); to have an ip address when the trunk cable is then limited to just tagged packets. I created some VLAN Adapters on the network tool by running System Preferences -> Network, selecting the starred button on the bottom of the interface list and selecting "Manage Virtual Interfaces". On each of these vlans I added a connection to the new adapter, selected DHCP, and set the vlan ID. On the managed switch, at the port that my adapter was connected to, I selected the PVID line to be "VLAN only"; that makes sure that only tagged vlan packets are passed on.
In order to test this combination, I took one of the VMs that I had previously connected to the USB-Ethernet adapter and changed the bridge interface to connect to one of these new VLAN Adapters, with the same vlan ID as the USB-Ethernet adapter vlan ID. I rebooted the VM and checked the ip that the VM had obtained. It came back with the previous subnet that it was connected to and the same ip on that subnet (my third router remembers). Once I was sure that the VLAN Adapter was working correctly, I moved all of the other VMs to that VLAN Adapter. Now I have the same circuit setup as before, only this time I can reuse the trunk cable for additional tagged vlan traffic.
My next trick will be to setup a VM based router to allow traffic between vlans via the VLAN Adapters.
In order to test this combination, I took one of the VMs that I had previously connected to the USB-Ethernet adapter and changed the bridge interface to connect to one of these new VLAN Adapters, with the same vlan ID as the USB-Ethernet adapter vlan ID. I rebooted the VM and checked the ip that the VM had obtained. It came back with the previous subnet that it was connected to and the same ip on that subnet (my third router remembers). Once I was sure that the VLAN Adapter was working correctly, I moved all of the other VMs to that VLAN Adapter. Now I have the same circuit setup as before, only this time I can reuse the trunk cable for additional tagged vlan traffic.
My next trick will be to setup a VM based router to allow traffic between vlans via the VLAN Adapters.
Subscribe to:
Posts (Atom)