- Patch Panels serve to be the ends of Ethernet wires. In general, I will not have a stray Ethernet cable coming out of a wall.
- I use keystones in all patch panels. This gives me the choice of terminating Ethernet wires either in a punch-down keystone, or a straight through keystone which has an Ethernet female on both sides.
- The advantage with using keystones is that they are easy to move around in a patch panel, or in the case of the straight through keystone, Ethernet connections behind them. Normally equipment moves and cables stay put; the keystones are a way of augmenting that "staying put".
- I refer to an individual keystone as a "port" in a patch panel. Each "port" must be numbered from 1 to the total number of ports on the patch panel.
- All patch panels in my house are numbered. If the patch panel serves only to connect to another patch panel on the other side of the wall, I may number it with the same number but I have to use the same "port" numbers on each side. So if I use "port" 1 on one side, then I must use "port" 1 on the other side so there is no confusion. In this case each patch panel gets the same patch panel number. I must also ensure that the Ethernet cable is straight through.
- The full designated "port" identifier is patch_panel_number-port_number, e.g. PP#3-12 would refer to keystone (or "port") 12 on patch panel number 3.
- I use a labeler to mark each "port" on each patch panel. When I mark a specific "port" I label it with the "port" that it connects to on the other end of the Ethernet cable. For instance, if PP#3-12 connects to PP#1-6 then on patch panel number 1, "port" 6 would be labeled PP#3-12, and on patch panel number 3, "port" 12 would be labeled PP#1-6. That way I always know where the Ethernet cable is connected and to what patch panel.
- If a cable is moved from one keystone to another on a patch panel, the label goes with it and I make up a new label for the port that it connects to so I am consistent. For instance, if PP#3-12 connects to PP#1-6, and I move the Ethernet cable from port 12 to port 10 on patch panel 3, then I move the PP#1-6 label from port 12 to port 10 on patch panel 3, then I make up a new label of PP#3-10, go to patch panel 1, remove the label on port 6, and replace it with the new label of PP#3-10. I also make note of it on any note that I have.
- Patch panels can always be used as "patch panels", i.e. I have places on patch panels that have a patch Ethernet cable between "ports" on the same patch panel. That way, it can form one long Ethernet connection.

This is a blog mostly about techie things, what I am doing to my apartment network on the cheap, IOT, 3D Printing, Raspberry Pis, Arduinos, ESP32, ESP8266, Home Automation, Personal Weather Stations, Things That Go Bump in the Night, and some side issues that need discussing. Remember, sometimes the journey to an end is as much fun as the goal achieved!
Thursday, June 18, 2020
Tips #1 - Patch Panels and Markings
In my network, I have found that the best way to maintain my understanding of how my house is wired with Ethernet is how that I document my Patch Panels. I have a few rules that maintain a cohesiveness to this:

Saturday, May 30, 2020
HomeLink HA Interface #8 - Now have Working Interface
From the point of getting NodeRed to run, I ran several tests to figure out how to publish mqtt messages that could be sent to my home-assistant server. Since there are three buttons on the clicker for testing, here are the flows that I used:


Friday, May 15, 2020
HomeLink HA Interface #7 - altered way to put NodeRed and setup interface
I was having difficulties with getting the docker version of node-red to do what I wanted to do with the Raspberry Pi. It seems like I wasn't able to update Node.js and the docker repository wasn't helping. So I decided to abandon the docker version of node-red, but keep docker, run node-red natively, and set it up to command the interface to send MQTT topics to my Home-Assistant server.
-- remove the docker-compose elements
sudo docker-compose down -rmi all
The preceding command not only stops all containers setup using docker-compose, but it removes the images after stopping the process.
Now that I have accomplished this, I move to install NodeRed on the Raspberry Pi natively.
-- install nodered, node.js
sudo apt update
sudo apt install build-essential git
bash <(curl -sL https://raw.githubusercontent.com/node-red/linux-installers/master/deb/update-nodejs-and-nodered)
This did manage to take a long time due to this being an RPi Zero.
-- remove the docker-compose elements
sudo docker-compose down -rmi all
The preceding command not only stops all containers setup using docker-compose, but it removes the images after stopping the process.
Now that I have accomplished this, I move to install NodeRed on the Raspberry Pi natively.
-- install nodered, node.js
sudo apt update
sudo apt install build-essential git
bash <(curl -sL https://raw.githubusercontent.com/node-red/linux-installers/master/deb/update-nodejs-and-nodered)
This did manage to take a long time due to this being an RPi Zero.
Thursday, September 5, 2019
HomeLink HA Interface #6 - finishing off the Interface including coding
So this project has been on the back burner for some time. I never got the hardware over to something besides a breadboard, and I did not have the software running in the RPi0W. I have a three day weekend coming up and I thought I might revive it and get it working with the Home-Assistant setup in my house. I am trying to at least get the interface to my car working with the lights on the porch using this setup. At this point I am thinking my best bet will be to load docker into the raspberry pi zero w and spin up a container of nodered to interface with the RPi0W and to send out packets to my MQTT server when buttons are pressed on my Subaru rear view mirror. I decided to use an 8GB micro SD for this project since not much will change.
1. First things first - install Buster using the Win32DiskImager (see Stupid RPi Tip #5)
2. Next update the OS (Buster went from test to stable, so have to use apt instead of apt-get first)
sudo apt update
sudo apt-get upgrade
3. Next install docker
curl -sSL https://get.docker.com | sh
4. now that we have docker installed, need to get a working version of nodered in a docker container; also, it might be nice to have Portainer running to check status; we will use docker-compose for this (I usually set everything up in a directory in /srv/docker/); docker-compose.yml file is as follows:
version: '3'
services:
portainer:
container_name: portainer
image: portainer/portainer
volumes:
- /srv/docker/portainer:/data
- /var/run/docker.sock:/var/run/docker.sock
ports:
- "9000:9000"
nodered1:
container_name: node-red-1
restart: unless-stopped
image: nodered/node-red-docker
user: root
volumes:
- /srv/docker/node-red-1/user:/data
- /etc/localtime:/etc/localtime:ro
ports:
- "1880:1880"
Prior to launching DockerCompose we need to have a directory /srv/docker/node-red-1/ and /srv/docker/portainer/ ready to go.
mkdir /srv/docker/portainer
mkdir /srv/docker/node-red-1
Now put the docker-compose.yml file into /srv/docker/ directory. Next launch DockerCompose
DockerCompose up
This should get us started with node-red running in the container
To Be Continued ...
1. First things first - install Buster using the Win32DiskImager (see Stupid RPi Tip #5)
2. Next update the OS (Buster went from test to stable, so have to use apt instead of apt-get first)
sudo apt update
sudo apt-get upgrade
3. Next install docker
curl -sSL https://get.docker.com | sh
4. now that we have docker installed, need to get a working version of nodered in a docker container; also, it might be nice to have Portainer running to check status; we will use docker-compose for this (I usually set everything up in a directory in /srv/docker/); docker-compose.yml file is as follows:
version: '3'
services:
portainer:
container_name: portainer
image: portainer/portainer
volumes:
- /srv/docker/portainer:/data
- /var/run/docker.sock:/var/run/docker.sock
ports:
- "9000:9000"
nodered1:
container_name: node-red-1
restart: unless-stopped
image: nodered/node-red-docker
user: root
volumes:
- /srv/docker/node-red-1/user:/data
- /etc/localtime:/etc/localtime:ro
ports:
- "1880:1880"
Prior to launching DockerCompose we need to have a directory /srv/docker/node-red-1/ and /srv/docker/portainer/ ready to go.
mkdir /srv/docker/portainer
mkdir /srv/docker/node-red-1
Now put the docker-compose.yml file into /srv/docker/ directory. Next launch DockerCompose
DockerCompose up
This should get us started with node-red running in the container
To Be Continued ...
HomeLink HA Interface #5 - Ooops!
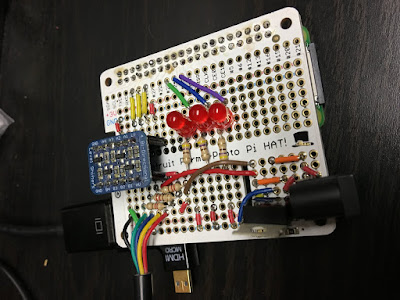
I decided to get back into putting the interface together and finishing out the prototype. I also decided to pull it apart from the breadboard and put the hardware onto an Adafruit perma-proto board that would interface directly to the RPi0W. Little did I know that I would make a strategic mistake.
First of all, I pulled up Fritzing and put the wiring up on the board (visually) as shown:

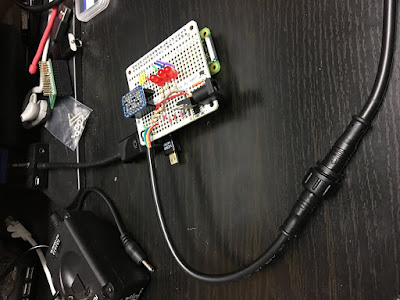
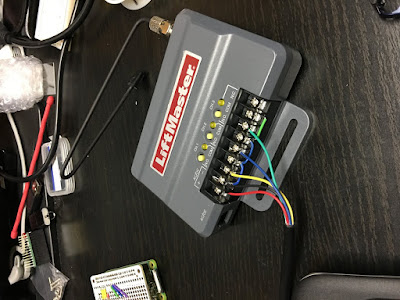
As shown, I added three red LEDs to be able to pulse as a visual reference when the HomeLink channel is selected. I also place a 7805 power tab in the lower right hand corner of the board. If the board looks weird it's because it is the size normally used for a regular sized RPi. And yes, it does overhang. The 5 lines are actually a cable that goes from the breadboard to the LiftMaster. These can be seen in the following images:
The Ooops in the title stems from the fact that when I applied power (9v to the breadboard connector) I encountered the following:
What I have since surmised is that the peripherals that I had plugged into the RPi0W were drawing way more than the 1 amp max the 7805 could handle. So what I plan on doing is removing the 7805 and replacing it with a 5v 2.5a supply that plugs into the RPi0W connected with a step up converter to push 9v to the LiftMaster which only draws 40ma.
First of all, I pulled up Fritzing and put the wiring up on the board (visually) as shown:

As shown, I added three red LEDs to be able to pulse as a visual reference when the HomeLink channel is selected. I also place a 7805 power tab in the lower right hand corner of the board. If the board looks weird it's because it is the size normally used for a regular sized RPi. And yes, it does overhang. The 5 lines are actually a cable that goes from the breadboard to the LiftMaster. These can be seen in the following images:


The Ooops in the title stems from the fact that when I applied power (9v to the breadboard connector) I encountered the following:
- while the RPi0W was booting, I tried out the clicker with the LiftMaster and it was working fine
- the bootup of the RPi0W seemed to be going fine, then it rebooted, and then rebooted, etc.
- I reached over to turn off the monitor I was using and burned my finger on the 7805 poking up from the breakboard
- I went and got my temperature laser reader and when I rebooted the RPi0W I was reading in short order about 150 degrees Fahrenheit. Way too much current was being drawn.
What I have since surmised is that the peripherals that I had plugged into the RPi0W were drawing way more than the 1 amp max the 7805 could handle. So what I plan on doing is removing the 7805 and replacing it with a 5v 2.5a supply that plugs into the RPi0W connected with a step up converter to push 9v to the LiftMaster which only draws 40ma.
Sunday, September 1, 2019
Project #16 - Add a DNS-DHCP-Radius Server for use Across the Network
It seems like a good idea to add a single place where I can get DNS, DHCP, and provide a Radius Server for authentication of the Routers and Switches.
Monday, July 22, 2019
Setting up a Certificate Authority on the RPi
One of the things that I have determined that I need in my system is the ability to create security certificates, especially X.509 certs. I don't want to have to spend money for certifications that I will only be using internally to my network or in connecting to my network. I can do this by setting up my own Certificate Authority (CA). A CA is used to create and sign certificates as being authenticate. Since I am in a controlled environment I can make sure that these certificates are specific to my needs and since I will not be releasing the public CA certificate, will allow me to control access to my network.
I can use the CA to sign certificates to be used with: my internal network connections, openVPN, and IPSec connections from the outside. In addition, I need to setup a simplified way of creating symetric encryption certificates. I will only have the CA open long enough to do what I need to do and then I will shut it down and remove it from my network - so it will remain secure from attack from the outside. I can also use it at work to do my certificates without being connected to a network so it is even more secure.
I used one specific article to setup my Certificate Authority at xxxxx. I am repeating the steps here for reference purposes:
Make an SSL Certificate Authority and Associated Certificates
(1) Create the Root Key
[Mydev@xxx My_CA]$ mkdir -p MyCA/cert MyCA/key
[Mydev@xxx My_CA]$ cd MyCA
[Mydev@xxx MyCA]$ openssl genrsa -aes256 -out key/Myca.key.pem 4096
Generating RSA private key, 4096 bit long modulus
.......................................................++
....................................................................++
e is 65537 (0x10001)
Enter pass phrase for key/Myca.key.pem:
Verifying - Enter pass phrase for key/Myca.key.pem:
[Mydev@xxx MyCA]$ chmod 400 key/Myca.key.pem
[Mydev@xxx MyCA]$
(2) Create the Root Cert
[Mydev@xxx MyCA]$ openssl req -key key/Myca.key.pem -new -x509 -days 3650 -sha256 -extensions v3_ca -out cert/Mycert.pem
Enter pass phrase for key/Myca.key.pem:
You are about to be asked to enter information that will be incorporated
into your certificate request.
What you are about to enter is what is called a Distinguished Name or a DN.
There are quite a few fields but you can leave some blank
For some fields there will be a default value,
If you enter '.', the field will be left blank.
-----
Country Name (2 letter code) [XX]:US
State or Province Name (full name) []:MyState
Locality Name (eg, city) [Default City]:MyTown
Organization Name (eg, company) [Default Company Ltd]:HOME
Organizational Unit Name (eg, section) []:HOME
Common Name (eg, your name or your server's hostname) []:My CERT
Email Address []:myemail@myemail.com
[Mydev@xxx MyCA]$
Note: cert/Mycert.pem is the CA's certificate and is public - this needs to be loaded into all clients in the My network. key/Myca.key.pem is the CA's private key - it is protected by the password MYCAKEYPASSWORD and it should be restricted access so that only root can read it.
(3) Create the First Server key/cert combo
[Mydev@xxx MyCA]$ mkdir myserver1
[Mydev@xxx MyCA]$ openssl genrsa -aes256 -out myserver1/myserver1.My.local.key 4096
Generating RSA private key, 4096 bit long modulus
.........................................................................................................++
................................................................................++
e is 65537 (0x10001)
Enter pass phrase for myserver1/myserver1.My.local.key:
Verifying - Enter pass phrase for myserver1/myserver1.My.local.key:
[Mydev@xxx MyCA]$ openssl req -new -key myserver1/myserver1.My.local.key -out myserver1/myserver1.My.local.csrEnter pass phrase for myserver1/myserver1.My.local.key:
You are about to be asked to enter information that will be incorporated
into your certificate request.
What you are about to enter is what is called a Distinguished Name or a DN.
There are quite a few fields but you can leave some blank
For some fields there will be a default value,
If you enter '.', the field will be left blank.
-----
Country Name (2 letter code) [XX]:US
State or Province Name (full name) []:MyState
Locality Name (eg, city) [Default City]:MyTown
Organization Name (eg, company) [Default Company Ltd]:HOME
Organizational Unit Name (eg, section) []:HOME
Common Name (eg, your name or your server's hostname) []:My OPERATOR CERT
Email Address []:myemail@myemail.com
Please enter the following 'extra' attributes
to be sent with your certificate request
A challenge password []:
An optional company name []:
[Mydev@xxx MyCA]$ openssl x509 -req -days 3650 -in myserver1/myserver1.My.local.csr -CA cert/Mycert.pem -CAkey key/Myca.key.pem -set_serial 01 -out myserver1/myserver1.My.local.crt
Signature ok
subject=/C=US/ST=MyState/L=MyTown/O=HOME/OU=HOME/CN=My OPERATOR CERT/emailAddress=myemail@myemail.com
Getting CA Private Key
Enter pass phrase for key/Myca.key.pem:
[Mydev@xxx MyCA]$
(4) Make a passwordless version of the server key
[Mydev@xxx MyCA]$ openssl rsa -in myserver1/myserver1.My.local.key -out myserver1/myserver1.My.local.key.insecure
Enter pass phrase for myserver1/myserver1.My.local.key:
writing RSA key
[Mydev@xxx MyCA]$ mv myserver1/myserver1.My.local.key myserver1/myserver1.My.local.key.secure
[Mydev@xxx MyCA]$ mv myserver1/myserver1.My.local.key.insecure myserver1/myserver1.My.local.key
Note: this passwordless key is the key that we will ultimately use so that we do not need human intervention when trying to use the certs. Otherwise you type in the cert password everytime you restart the service.
(5) Import the CA and Cert
Note: copy the MyCA/Mycert.pem, myserver1/myserver1.My.local.key, and myserver1/myserver1.My.local.crt files to the server. The MyCA/Mycert.pem has to be imported into the certificate store - this is the intermediate CA certificate and identifies the myserver1 certs as valid.
(6) Repeat for the Second cert
[Mydev@My-ib6-devel MyCA]$ mkdir myserver2
[Mydev@My-ib6-devel MyCA]$ openssl genrsa -aes256 -out myserver2/myserver2.My.local.key 4096
Generating RSA private key, 4096 bit long modulus
............................................................................................................................................................++
..................................++
e is 65537 (0x10001)
Enter pass phrase for myserver2/myserver2.My.local.key:
Verifying - Enter pass phrase for myserver2/myserver2.My.local.key:
[Mydev@My-ib6-devel MyCA]$ openssl req -new -key myserver2/myserver2.My.local.key -out myserver2/myserver2.My.local.csr
Enter pass phrase for myserver2/myserver2.My.local.key:
You are about to be asked to enter information that will be incorporated
into your certificate request.
What you are about to enter is what is called a Distinguished Name or a DN.
There are quite a few fields but you can leave some blank
For some fields there will be a default value,
If you enter '.', the field will be left blank.
-----
Country Name (2 letter code) [XX]:US
State or Province Name (full name) []:MyState
Locality Name (eg, city) [Default City]:MyTown
Organization Name (eg, company) [Default Company Ltd]:HOME
Organizational Unit Name (eg, section) []:HOME
Common Name (eg, your name or your server's hostname) []:My MAINTAINER CERT
Email Address []:myemail@myemail.com
Please enter the following 'extra' attributes
to be sent with your certificate request
A challenge password []:
An optional company name []:
[Mydev@My-ib6-devel MyCA]$ openssl x509 -req -days 3650 -in myserver2/myserver2.My.local.csr -CA cert/Mycert.pem -CAkey key/Myca.key.pem -set_serial 01 -out myserver2/myserver2.My.local.crt
Signature ok
subject=/C=US/ST=MyState/L=MyTown/O=HOME/OU=HOME/CN=My MAINTAINER CERT/emailAddress=myemail@myemail.com
Getting CA Private Key
Enter pass phrase for key/Myca.key.pem:
[Mydev@My-ib6-devel MyCA]$ openssl rsa -in myserver2/myserver2.My.local.key -out myserver2/myserver2.My.local.key.insecure
Enter pass phrase for myserver2/myserver2.My.local.key:
writing RSA key
[Mydev@My-ib6-devel MyCA]$ mv myserver2/myserver2.My.local.key myserver2/myserver2.My.local.key.secure
[Mydev@My-ib6-devel MyCA]$ mv myserver2/myserver2.My.local.key.insecure myserver2/myserver2.My.local.key
(7) Repeat for the Third cert
[Mydev@My-ib6-devel MyCA]$ mkdir myserver3
[Mydev@My-ib6-devel MyCA]$ openssl genrsa -aes256 -out myserver3/myserver3.My.local.key 4096
Generating RSA private key, 4096 bit long modulus
...........................................................................................++
..........++
e is 65537 (0x10001)
Enter pass phrase for myserver3/myserver3.My.local.key:
Verifying - Enter pass phrase for myserver3/myserver3.My.local.key:
[Mydev@My-ib6-devel MyCA]$ openssl req -new -key myserver3/myserver3.My.local.key -out myserver3/myserver3.My.local.csr
Enter pass phrase for myserver3/myserver3.My.local.key:
You are about to be asked to enter information that will be incorporated
into your certificate request.
What you are about to enter is what is called a Distinguished Name or a DN.
There are quite a few fields but you can leave some blank
For some fields there will be a default value,
If you enter '.', the field will be left blank.
-----
Country Name (2 letter code) [XX]:US
State or Province Name (full name) []:MyState
Locality Name (eg, city) [Default City]:MyTown
Organization Name (eg, company) [Default Company Ltd]:HOME
Organizational Unit Name (eg, section) []:HOME
Common Name (eg, your name or your server's hostname) []:My ADMINISTRATOR CERT
Email Address []:myemail@myemail.com
Please enter the following 'extra' attributes
to be sent with your certificate request
A challenge password []:
An optional company name []:
[Mydev@My-ib6-devel MyCA]$ openssl x509 -req -days 3650 -in myserver3/myserver3.My.local.csr -CA cert/Mycert.pem -CAkey key/Myca.key.pem -set_serial 01 -out myserver3/myserver3.My.local.crt
Signature ok
subject=/C=US/ST=MyState/L=MyTown/O=HOME/OU=HOME/CN=My ADMINISTRATOR CERT/emailAddress=myemail@myemail.com
Getting CA Private Key
Enter pass phrase for key/Myca.key.pem:
[Mydev@My-ib6-devel MyCA]$ openssl rsa -in myserver3/myserver3.My.local.key -out myserver3/myserver3.My.local.key.insecure
Enter pass phrase for myserver3/myserver3.My.local.key:
writing RSA key
[Mydev@My-ib6-devel MyCA]$ mv myserver3/myserver3.My.local.key myserver3/myserver3.My.local.key.secure
[Mydev@My-ib6-devel MyCA]$ mv myserver3/myserver3.My.local.key.insecure myserver3/myserver3.My.local.key
I can use the CA to sign certificates to be used with: my internal network connections, openVPN, and IPSec connections from the outside. In addition, I need to setup a simplified way of creating symetric encryption certificates. I will only have the CA open long enough to do what I need to do and then I will shut it down and remove it from my network - so it will remain secure from attack from the outside. I can also use it at work to do my certificates without being connected to a network so it is even more secure.
I used one specific article to setup my Certificate Authority at xxxxx. I am repeating the steps here for reference purposes:
Make an SSL Certificate Authority and Associated Certificates
(1) Create the Root Key
[Mydev@xxx My_CA]$ mkdir -p MyCA/cert MyCA/key
[Mydev@xxx My_CA]$ cd MyCA
[Mydev@xxx MyCA]$ openssl genrsa -aes256 -out key/Myca.key.pem 4096
Generating RSA private key, 4096 bit long modulus
.......................................................++
....................................................................++
e is 65537 (0x10001)
Enter pass phrase for key/Myca.key.pem:
Verifying - Enter pass phrase for key/Myca.key.pem:
[Mydev@xxx MyCA]$ chmod 400 key/Myca.key.pem
[Mydev@xxx MyCA]$
(2) Create the Root Cert
[Mydev@xxx MyCA]$ openssl req -key key/Myca.key.pem -new -x509 -days 3650 -sha256 -extensions v3_ca -out cert/Mycert.pem
Enter pass phrase for key/Myca.key.pem:
You are about to be asked to enter information that will be incorporated
into your certificate request.
What you are about to enter is what is called a Distinguished Name or a DN.
There are quite a few fields but you can leave some blank
For some fields there will be a default value,
If you enter '.', the field will be left blank.
-----
Country Name (2 letter code) [XX]:US
State or Province Name (full name) []:MyState
Locality Name (eg, city) [Default City]:MyTown
Organization Name (eg, company) [Default Company Ltd]:HOME
Organizational Unit Name (eg, section) []:HOME
Common Name (eg, your name or your server's hostname) []:My CERT
Email Address []:myemail@myemail.com
[Mydev@xxx MyCA]$
Note: cert/Mycert.pem is the CA's certificate and is public - this needs to be loaded into all clients in the My network. key/Myca.key.pem is the CA's private key - it is protected by the password MYCAKEYPASSWORD and it should be restricted access so that only root can read it.
(3) Create the First Server key/cert combo
[Mydev@xxx MyCA]$ mkdir myserver1
[Mydev@xxx MyCA]$ openssl genrsa -aes256 -out myserver1/myserver1.My.local.key 4096
Generating RSA private key, 4096 bit long modulus
.........................................................................................................++
................................................................................++
e is 65537 (0x10001)
Enter pass phrase for myserver1/myserver1.My.local.key:
Verifying - Enter pass phrase for myserver1/myserver1.My.local.key:
[Mydev@xxx MyCA]$ openssl req -new -key myserver1/myserver1.My.local.key -out myserver1/myserver1.My.local.csrEnter pass phrase for myserver1/myserver1.My.local.key:
You are about to be asked to enter information that will be incorporated
into your certificate request.
What you are about to enter is what is called a Distinguished Name or a DN.
There are quite a few fields but you can leave some blank
For some fields there will be a default value,
If you enter '.', the field will be left blank.
-----
Country Name (2 letter code) [XX]:US
State or Province Name (full name) []:MyState
Locality Name (eg, city) [Default City]:MyTown
Organization Name (eg, company) [Default Company Ltd]:HOME
Organizational Unit Name (eg, section) []:HOME
Common Name (eg, your name or your server's hostname) []:My OPERATOR CERT
Email Address []:myemail@myemail.com
Please enter the following 'extra' attributes
to be sent with your certificate request
A challenge password []:
An optional company name []:
[Mydev@xxx MyCA]$ openssl x509 -req -days 3650 -in myserver1/myserver1.My.local.csr -CA cert/Mycert.pem -CAkey key/Myca.key.pem -set_serial 01 -out myserver1/myserver1.My.local.crt
Signature ok
subject=/C=US/ST=MyState/L=MyTown/O=HOME/OU=HOME/CN=My OPERATOR CERT/emailAddress=myemail@myemail.com
Getting CA Private Key
Enter pass phrase for key/Myca.key.pem:
[Mydev@xxx MyCA]$
(4) Make a passwordless version of the server key
[Mydev@xxx MyCA]$ openssl rsa -in myserver1/myserver1.My.local.key -out myserver1/myserver1.My.local.key.insecure
Enter pass phrase for myserver1/myserver1.My.local.key:
writing RSA key
[Mydev@xxx MyCA]$ mv myserver1/myserver1.My.local.key myserver1/myserver1.My.local.key.secure
[Mydev@xxx MyCA]$ mv myserver1/myserver1.My.local.key.insecure myserver1/myserver1.My.local.key
Note: this passwordless key is the key that we will ultimately use so that we do not need human intervention when trying to use the certs. Otherwise you type in the cert password everytime you restart the service.
(5) Import the CA and Cert
Note: copy the MyCA/Mycert.pem, myserver1/myserver1.My.local.key, and myserver1/myserver1.My.local.crt files to the server. The MyCA/Mycert.pem has to be imported into the certificate store - this is the intermediate CA certificate and identifies the myserver1 certs as valid.
(6) Repeat for the Second cert
[Mydev@My-ib6-devel MyCA]$ mkdir myserver2
[Mydev@My-ib6-devel MyCA]$ openssl genrsa -aes256 -out myserver2/myserver2.My.local.key 4096
Generating RSA private key, 4096 bit long modulus
............................................................................................................................................................++
..................................++
e is 65537 (0x10001)
Enter pass phrase for myserver2/myserver2.My.local.key:
Verifying - Enter pass phrase for myserver2/myserver2.My.local.key:
[Mydev@My-ib6-devel MyCA]$ openssl req -new -key myserver2/myserver2.My.local.key -out myserver2/myserver2.My.local.csr
Enter pass phrase for myserver2/myserver2.My.local.key:
You are about to be asked to enter information that will be incorporated
into your certificate request.
What you are about to enter is what is called a Distinguished Name or a DN.
There are quite a few fields but you can leave some blank
For some fields there will be a default value,
If you enter '.', the field will be left blank.
-----
Country Name (2 letter code) [XX]:US
State or Province Name (full name) []:MyState
Locality Name (eg, city) [Default City]:MyTown
Organization Name (eg, company) [Default Company Ltd]:HOME
Organizational Unit Name (eg, section) []:HOME
Common Name (eg, your name or your server's hostname) []:My MAINTAINER CERT
Email Address []:myemail@myemail.com
Please enter the following 'extra' attributes
to be sent with your certificate request
A challenge password []:
An optional company name []:
[Mydev@My-ib6-devel MyCA]$ openssl x509 -req -days 3650 -in myserver2/myserver2.My.local.csr -CA cert/Mycert.pem -CAkey key/Myca.key.pem -set_serial 01 -out myserver2/myserver2.My.local.crt
Signature ok
subject=/C=US/ST=MyState/L=MyTown/O=HOME/OU=HOME/CN=My MAINTAINER CERT/emailAddress=myemail@myemail.com
Getting CA Private Key
Enter pass phrase for key/Myca.key.pem:
[Mydev@My-ib6-devel MyCA]$ openssl rsa -in myserver2/myserver2.My.local.key -out myserver2/myserver2.My.local.key.insecure
Enter pass phrase for myserver2/myserver2.My.local.key:
writing RSA key
[Mydev@My-ib6-devel MyCA]$ mv myserver2/myserver2.My.local.key myserver2/myserver2.My.local.key.secure
[Mydev@My-ib6-devel MyCA]$ mv myserver2/myserver2.My.local.key.insecure myserver2/myserver2.My.local.key
(7) Repeat for the Third cert
[Mydev@My-ib6-devel MyCA]$ mkdir myserver3
[Mydev@My-ib6-devel MyCA]$ openssl genrsa -aes256 -out myserver3/myserver3.My.local.key 4096
Generating RSA private key, 4096 bit long modulus
...........................................................................................++
..........++
e is 65537 (0x10001)
Enter pass phrase for myserver3/myserver3.My.local.key:
Verifying - Enter pass phrase for myserver3/myserver3.My.local.key:
[Mydev@My-ib6-devel MyCA]$ openssl req -new -key myserver3/myserver3.My.local.key -out myserver3/myserver3.My.local.csr
Enter pass phrase for myserver3/myserver3.My.local.key:
You are about to be asked to enter information that will be incorporated
into your certificate request.
What you are about to enter is what is called a Distinguished Name or a DN.
There are quite a few fields but you can leave some blank
For some fields there will be a default value,
If you enter '.', the field will be left blank.
-----
Country Name (2 letter code) [XX]:US
State or Province Name (full name) []:MyState
Locality Name (eg, city) [Default City]:MyTown
Organization Name (eg, company) [Default Company Ltd]:HOME
Organizational Unit Name (eg, section) []:HOME
Common Name (eg, your name or your server's hostname) []:My ADMINISTRATOR CERT
Email Address []:myemail@myemail.com
Please enter the following 'extra' attributes
to be sent with your certificate request
A challenge password []:
An optional company name []:
[Mydev@My-ib6-devel MyCA]$ openssl x509 -req -days 3650 -in myserver3/myserver3.My.local.csr -CA cert/Mycert.pem -CAkey key/Myca.key.pem -set_serial 01 -out myserver3/myserver3.My.local.crt
Signature ok
subject=/C=US/ST=MyState/L=MyTown/O=HOME/OU=HOME/CN=My ADMINISTRATOR CERT/emailAddress=myemail@myemail.com
Getting CA Private Key
Enter pass phrase for key/Myca.key.pem:
[Mydev@My-ib6-devel MyCA]$ openssl rsa -in myserver3/myserver3.My.local.key -out myserver3/myserver3.My.local.key.insecure
Enter pass phrase for myserver3/myserver3.My.local.key:
writing RSA key
[Mydev@My-ib6-devel MyCA]$ mv myserver3/myserver3.My.local.key myserver3/myserver3.My.local.key.secure
[Mydev@My-ib6-devel MyCA]$ mv myserver3/myserver3.My.local.key.insecure myserver3/myserver3.My.local.key
Subscribe to:
Posts (Atom)