
This is a blog mostly about techie things, what I am doing to my apartment network on the cheap, IOT, 3D Printing, Raspberry Pis, Arduinos, ESP32, ESP8266, Home Automation, Personal Weather Stations, Things That Go Bump in the Night, and some side issues that need discussing. Remember, sometimes the journey to an end is as much fun as the goal achieved!
Tuesday, January 15, 2019
Project #15 - Add a Hacking Lab to the Network

Tuesday, November 13, 2018
Cataloging Patch Panel Connections
PP#1: (toolroom)
15, 16 empty
1- To Kitchen/Dining Rm Ethernet plug (patch to .115-3)
2- To TIVo Mini downstairs (patch to PP#1-4)
3- To Computer Rm-Hutch wall (n/c)
4- to PP#2-1 (patch to PP#1-2)
5- to cable20 / cable21 .114-1 (patch to PP#1-11)
6- to PP#2-4 (patch to PP#1-9)
7- to black cable2 PP#6-2 (patch to Unmgd sw)
8- to light blue cable6 PP#6-1 (patch to .115-7)
9- to dark blue, PP#5-Y (patch to PP#1-6)
10 - to PP#2-8 (n/c)
11- to PP#3-19 (patch to PP#1-5)
12- to PP#4-X (patch to .115-5)
13- to PP#2-2 (patch to .115-2)
Friday, September 7, 2018
HA #1 - Making Changes to the Network for Home Automation
Monday, August 20, 2018
HomeLink HA Interface #4 - Slowdown to use a breadboard

This was pretty much as simple as I could get it. I am using a slightly different Buck-Converter than the Adafruit one shown in the Fritzing diagram, but the principle is the same (9v -> 5v power for the RPi Zero W). I am assuming at this point that when the relay switches and drops the voltage to zero that the 9v power will not drop below the point where the RPi will "brown out." The resistors are 220 ohm which will give a draw of 40 ma from the 9v power supply during the relay switch. Note that the 850LM channel 1 is tied to GPIO4, channel 2 is tied to GPIO5, and channel 3 is tied to GPIO6 on the RPi Zero W. The fritzing RPi is a Zero but that is okay for illustration purposes since the GPIO pinouts are the same. The use of a RPiZW is for wifi access in my IOT vlan.
Wednesday, August 15, 2018
HomeLink HA Interface #3 - Started the breadboarding process using an RPiZW, Buck converter, and 850LM
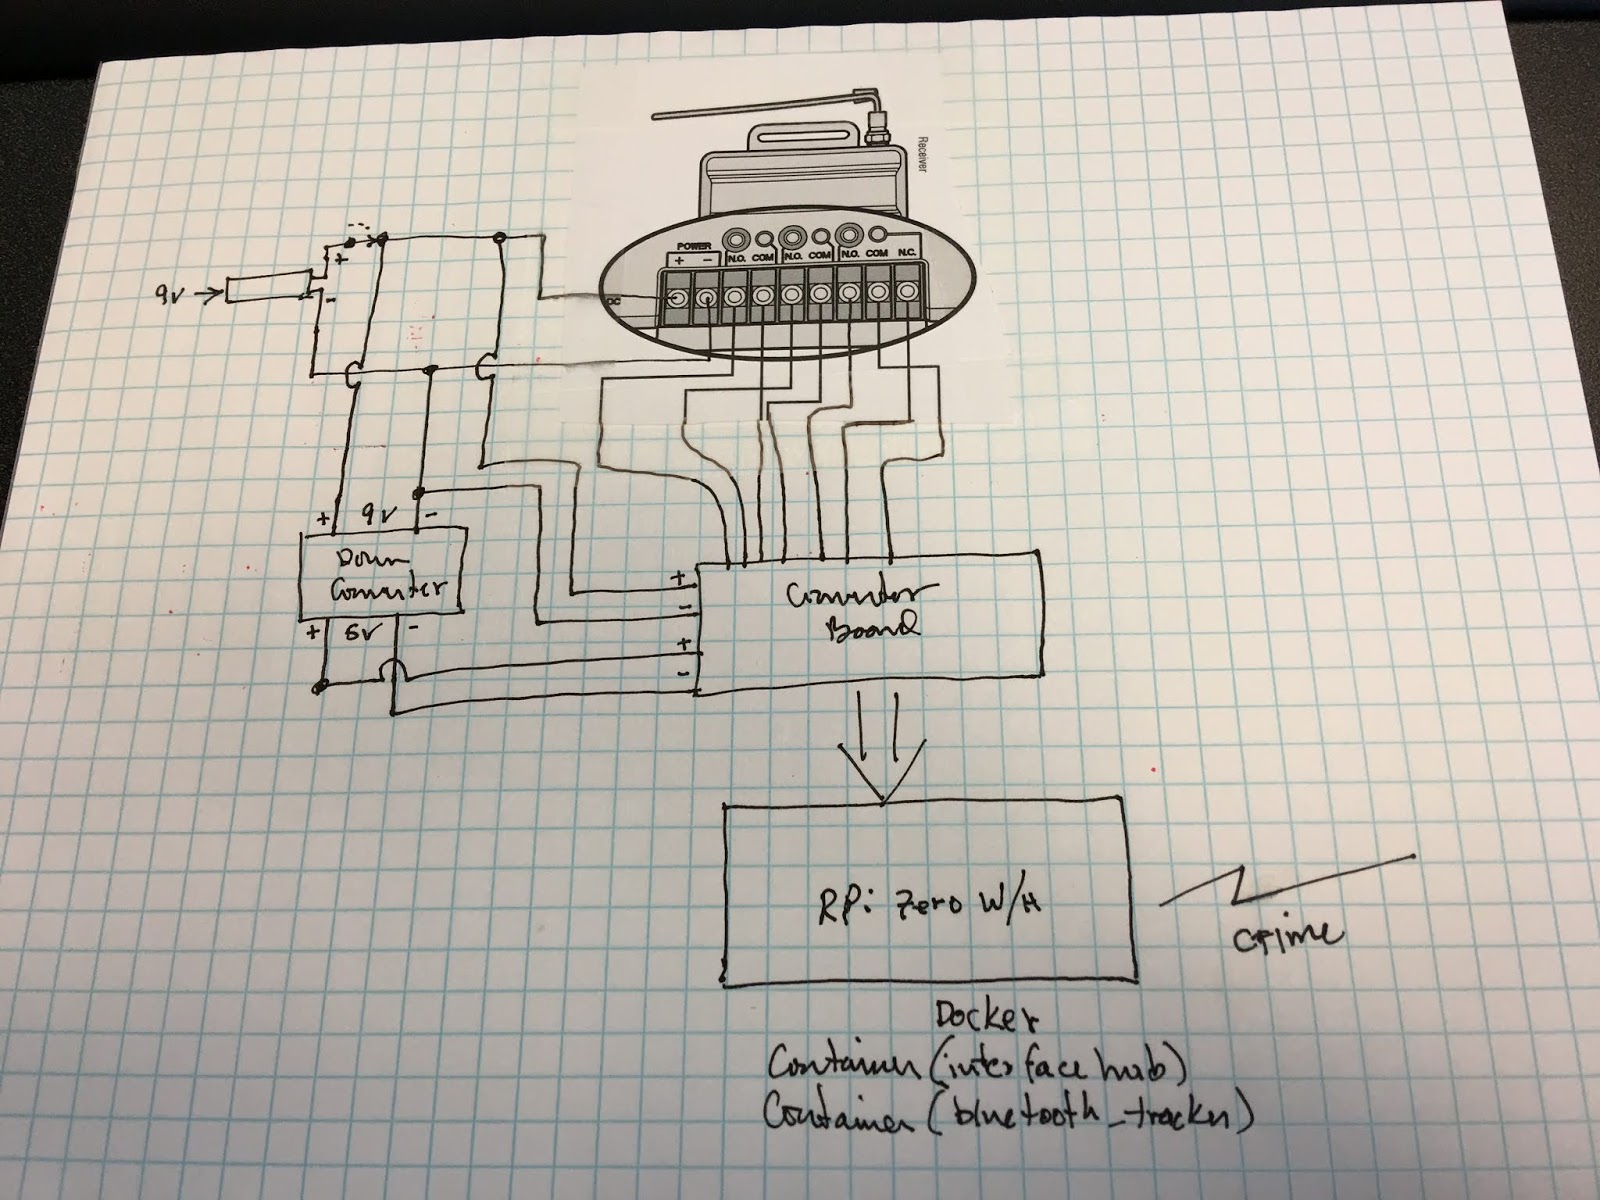
The converter board will actually be a breadboard connected to the RPiZW gpio pins. I am planning to initially mount the Down Converter (Buck) to the same breadboard. However, I need to get everything set up first before moving the parts to the RPiZW breadboard. So, the initial physical setup looks like this:

The RPiZW is rather small compared to the LiftMaster 850LM, so piggy backing everything on one breadboard for the prototype is probably ok. I also need to figure out a model to print from my 3D printer to contain everything.
Tuesday, August 14, 2018
HomeLink HA Interface #2 - Experiments with the LiftMaster 850LM
I wonder if I can mount the Buck converter on the breadboard as well, that would save some space for me. I am also concerned that the Buck converter might interfere with the functioning of the RPi, but I will have to test that out as everything is built.
Thursday, July 12, 2018
HomeLink HA Interface #1 - Development of a RPi Based Integration with a Liftmaster 850LM and Home Assistant
So here is the brain-fart. I have a Subaru Forester that has a set of HomeLink buttons on the auto-dimming rear-view mirror. I don't have a garage, but I do have a porch with lights. So, my first interaction was to add a Chamberlain light switch to the porch lights which I can command to go on and off from one of the HomeLink buttons. Now I can turn on the porch lights when I get home late, and turn them off when I get in the house. That was very little effort and I did that before I decided to go into Home Automation. I removed a dimmer switch to put in the Chamberlain light switch. I miss the ability to dim the lights on the front porch. Why can't I have both a dimming capability and a HomeLink turn on and off ability. In fact, why can't I use the HomeLink buttons to key off a "scene" like turn on the porch lights (if it's dark outside), turn off the living room lights, lock the door, set the alarm, wait for x minutes so you can get out of the driveway before turning off the porch lights? Then, when I come home I just use a different HomeLink button to do the reverse? Hence my desire to integrate something into the Home Automation sequence using HomeLink.
I was able to locate / buy a Liftmaster 850LM switch which has the ability to integrate with the HomeLink switches and garage door opener remote controls. Normally it is used to control a garage door, but interestingly enough, I can sense the latches with an ESP8266 / Arduino / Raspberry Pi (take your pick) and push out the state of those latches using MQTT to the Home Assistant automation platform. If I want, I discovered that the 850LM can run on as little as 9 volt DC input. The Adafruit 757 bi-directional logic level converter has a max input on the high side of 10 volts which means that I could go through the 757 from the 850LM to whatever device I want to sense the state change. I can then use the chosen device to use MQTT to send state information changes to the Home-Assistant center. If I am real smart I can use a length of time timer that a HomeLink button is held down to increase the number of different states that I can report and if I use an RPi with Docker I can do other things at the same time. Oh, and two clicks within 1 second would give me a third level, but let’s not get ahead of ourselves. Anyway, it's worth investigating.
So now to get from Brain-Fart to working system.